Showing posts with label Hybrid Skype for Business. Show all posts

Friday, November 9, 2018

Configuring Skype for Business Hybrid with GCC High Tenants

Configuring Skype for Business Hybrid with a GCC High Office 365 tenant is mostly the same, but it turns out that there are a few differences in terms of the DNS records and FQDNs that get set when running the PowerShell cmdlets. This brief posts walks you through the differences.


Differing DNS Records


When working with [U.S.] GOV tenants in Office 365, there are a couple different types of tenants that reflect varying levels of compliance & security requirements. Namely, there is:

  • Office 365 GCC
  • Office 365 GCC High and DoD
There are a number of compliance requirements that are met by each type of tenant, as can be guessed by the difference in names. Clearly, the Office 365 GCC High and DoD tenants meet a more strict set of requirements, as well as those that specifically target DoD entities.

There are several components to the architecture of these tenants that allow them to meet a more stringent set of requirements, and one of them is reflected by the difference in FQDNs and URLs that are used by endpoints to connect into these environments. Specifically, the Office 365 GCC High tenants (DoD is still being worked on) have a different list of required DNS records than your typical commercial tenant. While we are focusing on Skype for Business Online here, this also applies to Exchange Online.

The DNS records that are required for Skype for Business Online in a GCC High tenant are below:

CNAMEs
  • 'sip'
    • Points to: sipdir.online.gov.skypeforbusiness.us
  • 'lyncdiscover'
    • Points to: webdir.online.gov.skypeforbusiness.us
SRV
  • '_sip'
    • Points to: sipdir.online.gov.skypeforbusiness.us
    • Port: 443
    • Protocol: _tls
  • '_sipfederationtls'
    • Points to: sipfed.online.gov.skypeforbusiness.us
    • Port: 5061
    • Protocol: _tcp

Configuring Hybrid

As you can imagine, given the difference in the DNS records, you will want to slightly modify the PowerShell cmdlets that you use when setting up Hybrid for a Skype for Business environment that includes a GCC High tenant. Specifically, when running the New-CsHostingProvider cmdlet, you will want to do so like this, with the specified ProxyFqdn and AutoDiscoverUrl attributes:

New-CsHostingProvider -Identity SkypeforBusinessOnlineGov -ProxyFqdn -"sipfed.online.gov.skypeforbusiness.us" -Enabled $true -EnabledSharedAddressSpace $true -HostsOCSUsers $true -VerificationLevel UseSourceVerification -IsLocal $false -AutodiscoverUrl https://webdir.online.gov.skypeforbusiness.us/Autodiscover/AutodiscoverService.svc/root

The rest of the Hybrid configuration is pretty much the same. Next, when it comes to moving users via the Management Shell, you will modify the cmdlets like so:

Move-CsUser -Identity <user@domain.com> -Target sipfed.online.gov.skypeforbusiness.us -Credential $cred -HostedMigrationOverrideUrl https://admin1g.online.gov.skypeforbusiness.us/HostedMigration/hostedmigrationservice.svc.

So, to summarize, while I hate to seem like I am simplifying, we are pretty much putting 'gov.skypeforbusiness.us' anymore that 'lync.com' would typically show up in our Hybrid configuration process.

I hope this is able to save someone even a little bit of pain, somewhere. It seems like such a small thing, but if you are not aware of these differences, the errors that you will run into do not do a great job of letting you know where to start, and none of the "Configure Hybrid" documentation does a great job at calling out that there are differences for GCC High tenants.

Monday, April 17, 2017

Deltapath's O365 Connector Brings More Options to Hybrid

I recently had the opportunity & privilege to have a long-distance face-to-face sit-down with Deltapath's Founder & CEO, David Liu, to discuss a newly launched product: Deltapath O365 Connector. This product intrigued me, specifically because it provided a creative solution to an issue that I have personally seen several clients try to tackle. In this blog post I will aim to provide a brief overview of some of the features of the Deltapath O365 Connector, and will then go into the specific use case that it solves for that caught my attention.

Deltapath O365 Connector Overview


At its most basic level, the O365 Connector is a physical device that sits in an organization's physical datacenter. It provides connectivity between an organization's Skype for Business Online users and it's on-premises PBX and PSTN services. You may wonder why that functionality is different than CCE or other native hybrid Skype for Business Server solutions, and I will get to that in a minute.

The O365 Connector has multiple roles all wrapped into a single device, including a Session Border Controller (SBC), firewall, SIP Proxy, Call Routing Engine, and even an Endpoint-Provisioning Server. This is a lot to pack into a product, and accordingly, the functions and features of this device go well beyond the specific use case that I want to cover today. For that reason, I will provide a link to the product page so that you can dive a bit deeper on your own, at your own leisure:

https://www.deltapath.com/products/deltapath-o365-connector

Beyond the device's capabilities, Deltapath provides three different versions of its device, allowing organizations of various sizes to get a device that more closely matches its specific needs. The following chart from Deltapath highlights each size of the device, along with corresponding specs:


There are also a number of additional Modules that can be obtained and used with these devices. Per Deltapath's marketing materials, these modules include:
  • Call Conversation Recording
  • Inbound Contact Center
  • Outbound Contact Center
  • Serviced Office
  • Call Billing
  • Alarm Notification & Escalation
  • Building Management System Integration
  • Acute Hospital Communication
The O365 Connector can also be launched in a pair, as a cluster, introducing an element of redundancy.
Lastly, this device can be provisioned and configured with a simple and easy-to-use web GUI interface, easing administration concerns of introducing another device into an already complex on-premises telephony infrastructure.

Again, this post will not be diving into all of these features or modules, but I wanted to call them out for those organizations that may want be looking for these features in addition to the use case that I will be highlighting below.


Enhanced Hybrid Use Case


Consider the following scenario: an organization has an existing on-premises telephony infrastructure, including a PBX and PSTN services, and also has Skype for Business Online users in Office 365 that are licensed with E1 or E3. This organization wants to allow these Skype for Business users to have PSTN calling capabilities, but does not want to upgrade to E5 or purchase Cloud PBX add-on licensing. The reasons for this could be as simple as compliance restrictions of some sort that requires them to keep their PBX functionality on-premises, or a number of other reasons. So, how do they provide these non-Cloud-PBX Skype for Business Online users with PSTN capabilities using their own on-premises PBX and PSTN services?

This is the problem that O365 Connector provides a solution for, presenting yet another way to explore Hybrid for organizations that may not be able to go down some of the other more mainstream paths at this time.

The way that this solution works is actually quite interesting. The O365 Connector device resides in a perimeter network architecture. If used as a firewall, a public IP can be assigned directly to one interface of the device, with the other interface able to communicate with the internal LAN. Otherwise, the device can be behind a firewall, with a public IP NAT translating to the device's external interface on a private network. A public DNS record (for example, ms.demodomain.com) will resolve to the associated public IP of the device, and Office 365 Federation will be configured with the 'ms.demodomain.com' FQDN.

The device can have certain SIP endpoints (like Polycom VVX phones) register directly to it, but for non-SIP devices, the device will communicate with another device, like a Cisco Call Manager or other PBX. When a user from either type of device dials a phone number, SIP address, or an extension of a Skype for Business Online user, the O365 Connector sends the call to the Skype for Business user (it can also do sim-ring if that user also has a non-SIP endpoint).

How does a Skype for Business user dial a phone number, then, since again, they are not Cloud PBX users? Well, the Skype for Business user dials a regularly dialed phone number, or an extension, in the format: '15551234567@ms.demodomain.com', or an extension as '5555@ms.demodomain.com'. This reaches out via federation to the O365 Connector device at 'ms.demodomain.com', and the device will then send the call to the appropriate destination. Example:

Image Courtesy of Deltapath


This may be a bit confusing to read through, so I will refer to this very handy graphic created by
Deltapath to illustrate the various forces at work here:


To help understand each step in a color-coded way, the below Deltapath graphic explains the call flows a bit better:


As you can see, this solution provides a very unique bridge for environments that need/desire to provide PSTN calling capabilities to their Skype for Business Online users, without moving any of their call-control functionality into Microsoft's cloud.

Clearly, there may be a challenge with the fact that dialing is not done via a dialpad by the Skype for Business users. Instead, they must be trained to place these calls by using an email-like format. This does present a learning curve that an organization will have to plan appropriately for. Obviously, this is a fact that will have to be weighed as part of the strategy and decision-making process; organizations will have to decide if the learning curve is acceptable in relation to the unique problem that the device solves for.


In Conclusion...


The focus of this blog post was on a specific use case that the Deltapath O365 Connector provides a unique solution for: Skype for Business Online users, without Cloud PBX functionality, that need PSTN dialing capabilities through their organization's on-premises telephony infrastructure. In this regard, the solution does indeed tell a compelling story. It also helps that the device can meet other needs within the same solution, including things like firewall capabilities and endpoint provisioning. You can get more information about the product at the link provided above, and should even be able to schedule some sort of demo with their team. It never hurts to investigate all your options when 3rd-party tools are needed to fully meet your requirements!

Monday, February 6, 2017

Tenant Dial Plans: Custom / Extension Dialing in Cloud PBX (Office 365): A Preview

***

Update: Microsoft "graduated" Tenant Dial Plans from Preview to General Availability (GA) on April 20, 2017. The blog post making this announcement (as well as providing the updated training links) can be found here:

https://techcommunity.microsoft.com/t5/Skype-Operations-Framework-Skype/Tenant-Dial-Plans-General-Availability-training/ba-p/63604

As the post states, pretty much everything is the same at GA as it was in Preview, so no real news to announce. The one change that they called out was that External Access Prefix is not supported at the time of GA launch. Best of luck on creating your custom Cloud PBX Dial Plans, but be careful!

***

For those of you that have been eagerly awaiting the arrival of custom dial plans in Skype for Business Online, your waiting days are narrowing significantly! Tenant Dial Plans have been introduced into Preview, and Microsoft is accepting applications to the preview program from customers that are under NDA and have a Skype for Business Online tenant in Office 365. First, a brief word on Why this is a big deal and what the desired functionality is that is being achieved.


What's the Deal with Tenant Dial Plans


Almost as soon as customers were able to start using Cloud PBX for placing PSTN phone calls in Skype for Business Online, the topic of customizing the Dial Plan was brought up and echoed across the landscape of users. The issue is that the ability to implement Custom Dial Plans in Skype for Business Online Cloud PBX is not a currently available function. This means that users cannot do extension dialing, or any other custom dialing scenario, outside of the default dialing scenarios that were defined by Microsoft by default. This default dialing behavior is pretty much restricted to dialing a full 10 digits (for the U.S.), or dialing in E.164.

With the ability to customize dial plans and normalization rules built deeply into Enterprise Voice in Skype for Business on-prem, why did Microsoft launch Cloud PBX without this ability from the start. Honestly, I believe the biggest reason is that Microsoft has been trying to change the narrative on how a user should dial their colleagues. With a strengthened unified communications tool homed in the Cloud, Microsoft wants users to start interacting with each by name. For example, when you lookup a user for a chat, or to see their presence, you either go to their contact object in the Skype for Business Contact List, or you start typing their name into the search bar:


Once you see the user you want, you can double-click the user to start a chat, right-click to see their Contact Card, add them to a list, and more. Microsoft wants you to take this a step further. They want organizations to embrace calling a user by "dialing" to be outdated; "so yesterday"; archaic. Get the point? Instead, they wanted organizations to get in the habit of "dialing" by looking up the user clicking to call. See below:


If I am being perfectly honest, Microsoft is pushing us in the right direction. This is a much simpler way to manage contacts and interact with them. A single approach to all forms of communication. However, this proved to simply be WAY too much change for end users in many organizations. End users want to keep working the way they always have; change tends to throw them for a loop, and it is often resisted. (It would appear that clicking to call a user is such a massive shift in thinking, that it will need to be phased into most organizations in a slower, gentler, more phased approach.)

"End users Want to keep working the way they always have; change tends to throw them for a loop, and it is often resisted." 

This reason is exactly why Microsoft started working on Tenant Dial Plans. The response and feedback on this one area was so great that it became clear that this functionality must follow Skype for Business into Office 365.

Tenant Dial Plans delivers on this need. It allows organizations to create tenant-based Dial Plans, with customized sets of normalization rules, to properly meet the granular dialing needs (wants) of the organizations that have begun adoption of Cloud PBX. In fact, many organizations have held off on adoption, or even exploration, of Cloud PBX due to this feature requirement alone. If an organization needs to have 4-digit-dialing, or 6-digit-dialing, or whatever, they can now achieve that in Office 365 by using Tenant Dial Plans.


Sign Me Up!


Ok, you are convinced. You have been waiting for this, and now want to start testing this out with some pilot users (because you should not be deploying a Preview toolset into Production!). How can you go about getting signed up. To be considered for the Preview, your organization must have a tenant that is currently using Skype for Business Online with Cloud PBX and be under NDA with Microsoft. First go to the Skype Preview website, click on Organization (this is not available to Individuals, check the box next to Tenant Dial Plans, and lastly click Sign Up. You can figure the rest out from there, I think.


Important Points to Remember


There are several important things to remember about using Tenant Dial Plans. I will cover a list of them here in Q/A format, and will also provide a look to a good Skype Academy video in which this information is covered and demoed.

Q: So, how many Normalization Rules can I add to a Dial Plan?
A: Good question! You can add up 25 normalization rules per Dial Plan?

Q: If I create a new "Tenant Dial Plan", will it apply to all of my Cloud PBX users?
A: A Tenant Dial Plan can either be scoped at the Global level, where it will apply to all of your Cloud PBX users, or it can be scoped and assigned at the User level. The below screenshot is from Scott Stubberfield's Skype Academy video demoing Tenant Dial Plans, and lays out the difference between the scopes and types of dial plans nicely:


Q: What about my Cloud PBX users that are in a Hybrid configuration? Do these Tenant Dial Plans apply only to PSTN Calling users, or also to On-Premise PSTN Connectivity and Cloud Connector Edition users?
A: Tenant Dial Plans apply to ALL Cloud PBX users. Regardless of the direction the user's PSTN calls go (Online through Microsoft services, or on-prem through CCE or existing telephony infrastructure), their dialing habits can be supported by Tenant Dial Plans.

Q: Yeah, so I assume that I will be able to manage these Dial Plans and normalization rules in a shiny new GUI, like with Skype for Business Server 2015?
A: Currently, the Preview only provides the ability to create and manage dial plans and normalization rules via remote PowerShell cmdlets; there is no sign of any of this in the Skype for Business Admin Center. Scott Stubberfield mentions a possible distant GUI companion to these cmdlets in the works "down the line" via his tutorial video, but no solid dates or commitments around that at this time.

Q: Do the Dial Plans in Cloud PBX work the same way as they do On-Prem, with the most granularly-scoped Dial Plan taking effect for a user?
A: Actually, no, and this is a good thing. If this were the case, and you assigned a Tenant Dial plan rather than leaving the existing default Service Dial Plan in place, you would have to create normalization rules for all of your user's dialing scenarios. Instead of the most granular dial plan taking effect, Cloud PBX merges the rules for the default Service Dial Plan for the user's location with the rules for any Tenant Dial Plans have been assigned to the user. The benefit to this is that all the normal dialing rules that already apply to Cloud PBX users do not have to be re-created in the new Tenant Dial Plans; instead, the normalization rules in the Tenant Dial Plans can be limited only to the additional dialing scenarios that you want to account for. Brilliant, right?! Below is another screenshot from Scott Stubberfield's demo Skype Academy video shows this concept in a clear and concise format:


Summary


In this blog post I have given a brief introduction to what Tenant Dial Plans is, what it currently looks like in Preview, and why it is freakin' awesome. I hope many of you that have been exploring and testing with Cloud PBX are as excited about this as I am! In the next post, we will go over some of the cmdlets that were introduced for the purposes of managing these new Tenant Dial Plans. In the meantime, if you want to learn more about Tenant Dial Plans, check out the Skype Operations Framework training via the Skype Academy:

https://techcommunity.microsoft.com/t5/Skype-Operations-Framework-Skype/Tenant-Dial-Plans-Preview-training/ba-p/43521

Stay techy, my friends!


Friday, February 3, 2017

#Skype4BRecap - 02/03/2017 - MVP Changes, PSTN Calling in Spain, Tenant Dial Plans (Preview) Training

Two weeks in a row, the #Skype4BRecap has been published on time! Now I just need to keep up the momentum. This week was a big week for Skype for Business and other Microsoft UC community news, so please pardon the fast-speaking; I had a lot of good content to get out in a short period of time! Bigger topics include some major changes to the MVP Award program, General Availability (GA) of PSTN Calling in Spain, and some new video-based training of Tenant Dial Plans (Preview), but you can check out the full list of topics below. Enjoy the episode:


Topics

If you would rather watch the episode at my YouTube channel instead of in the window above, check it out here: https://youtu.be/5lXp9iFnBfE

Stay Techy, My Friends!

Monday, October 31, 2016

Move-CsUser : HostedMigration Fault: Error=(506) - Cannot Migrate Skype for Business User From Online to On-Prem

The Error


I recently had the pleasure of running into this seemingly elusive "506" error when trying to migrate users that had already been configured for Skype for Business Online to a brand new On-Prem environment after configuring Hybrid. I say "elusive" because I could not find a solution on Bing or Google (yes, I started with Bing!). The actual error read as follows:

Move-CsUser : HostedMigration fault: Error=(506). Description=(The user could not be moved because there appears to be a problem with this user account. Please verify the attribute settings on the account and then try again.)


The Scenario

Let's get a good handle on what this environment looked like, and what it was currently at the time of this error, as this information is key. This organization had Hybrid Exchange setup, but all the mailboxes were homed in Exchange Online. They had also been using Skype for Business Online exclusively; there was no on-prem Skype for Business infrastructure. Lastly, Azure AD Connect was properly set up, and syncing without errors. All good and pretty!

Now, the goal here was to implement an on-prem Skype for Business deployment so that users in a particular geography could use the on-prem voice infrastructure. The plan was to implement the on-prem infrastructure, configure Hybrid for Skype for Business, and then move the users in this particular geography to the on-prem infrastructure while leaving all other users in the Online environment. Everything up to the step in which users are moved to On-Prem worked fine.

The Troubleshooting

So, Hybrid was configured, the on-prem environment worked well on its own, and the Online users were registering through the on-prem environment without a hitch. Why then, could we not simply move the users to the on-prem environment? Looking at the above error, the complaint seems to be centered around a problem with attributes. Ok, first thing, go back and ensure that your Azure AD Connect configuration is syncing successfully.

A quick look in Office 365 Admin Center verifies that the sync is happening at regular intervals, and happening successfully. Next, lets go to the actual AADC server, and make sure that the attributes for Skype for Business are all syncing successful...WAIT!!! Of course the Skype for Business attributes are not syncing! Remember, AADC was setup and configured to sync BEFORE the on-prem Skype for Business infrastructure was ever in place! Remember, one of the first things we do when installing Skype for Business Server 2015 is to extend the Schema so that all the new Skype for Business-specific attributes will be present within AD. Since AADC was installed and configured before this Schema Extension took place, AADC is not aware of these new Skype for Business attributes.

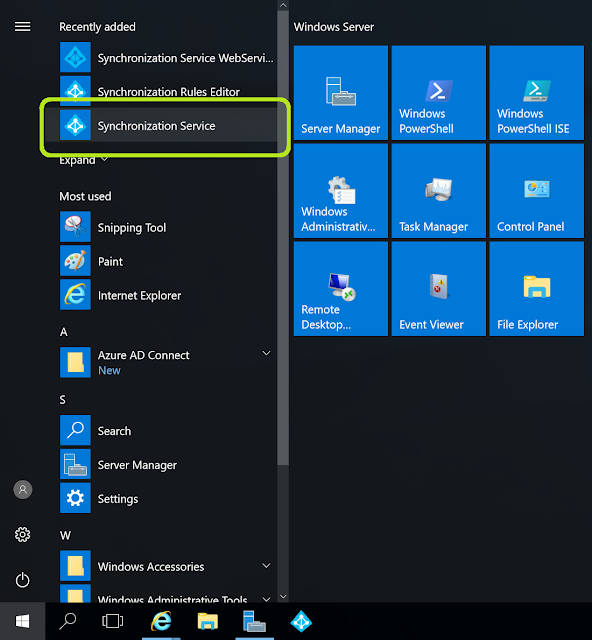
So, we go onto the AADC server, and from the START menu we find the Synchronization Service for Azure AD Connect:


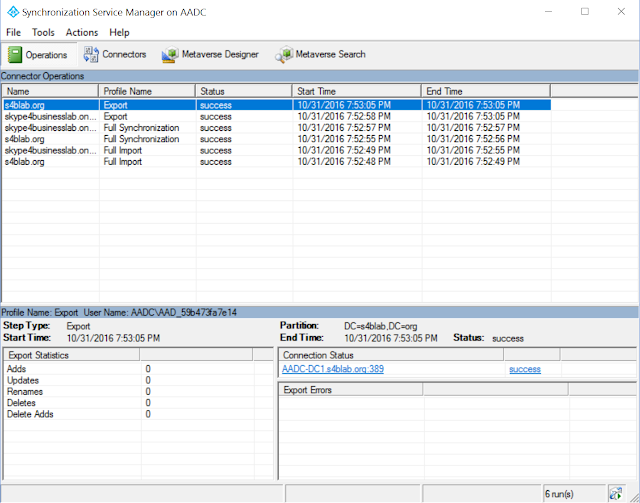
Click on it to open up the GUI:


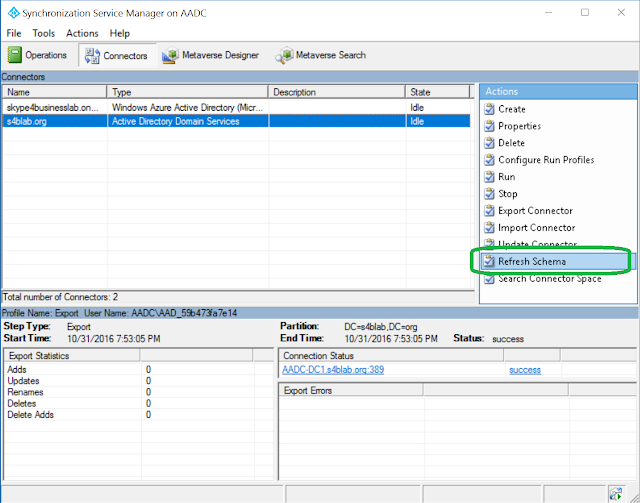
Now, let's navigate to Connectors at the top of the tool, and for each Connector (we'll do both for good measure, but highlight one at a time and perform the action), click on Refresh Schema from the list of action items on the right side of the tool:


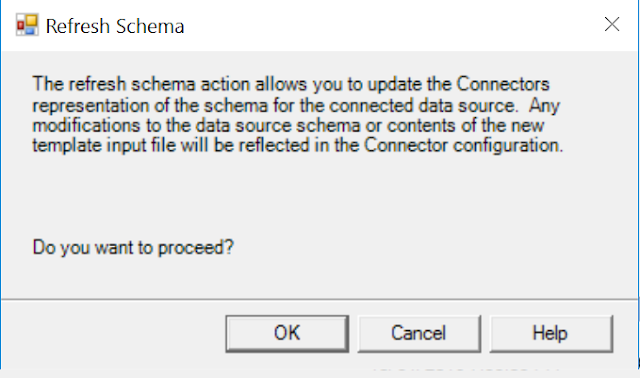
Read the warning text, and then click OK to implement the Schema Refresh:


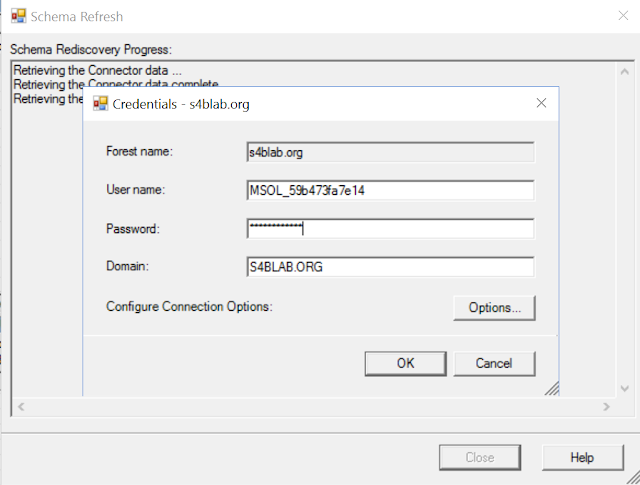
You will then need to provide credentials to connect to the Directory for the specific connector. The below image reflects that we are attempting to connect to the on-prem Active Directory, and the password must be provided. Don't forget to change the User name to a Domain Admin in your org as well; I did not do this for the below image, but did afterwards:


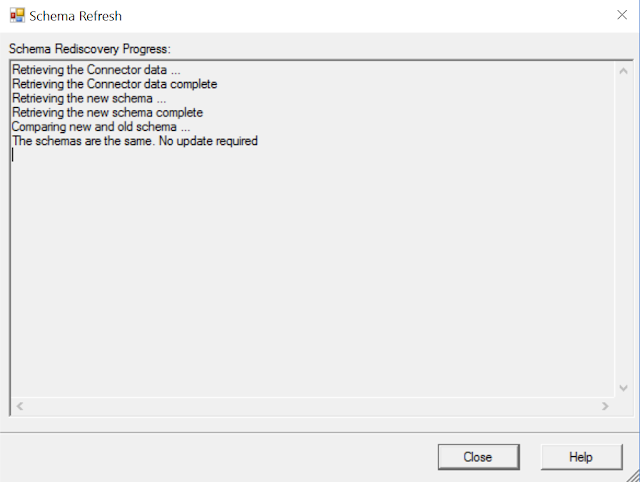
As you can see below, the Schema's are compared, and in the case of my test lab, there were no Schema updates, but in the scenario described in this blog post, you will see the Schema changes that were detected.


The Fix


Ok, once I updated the Schemas I waited for the next sync to occur from AADC, to make sure all the new attributes were synced to Skype for Business Online. However, after waiting for the successful sync, and trying the Move-CsUser operation once again, it STILL failed!

This is the point at which I put in a ticket with Microsoft through the Office 365 Admin Center. As usual, they responded very quickly. After going through the environment together for a while, the Microsoft tech zeroed in on one fact that I did not think anything about when I saw it. First we opened up Azure AD Connect, and then clicked on View Current Configuration:


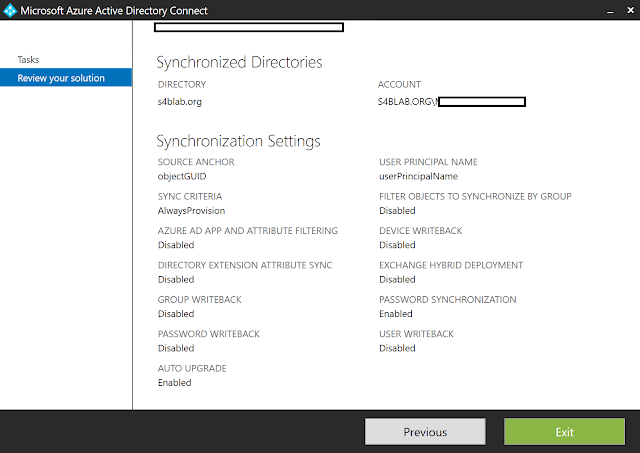
Finally, something on the next screen stuck out to him. Can you guess what it is from the below image:


Well, if you didn't guess it, welcome to the club. It was the fact that Exchange Hybrid Deployment was disabled! Yep. EXCHANGE HYBRID.

Of course, I argued that this shouldn't matter, as this should be for Exchange Hybrid settings; there is no checkbox for Skype for Business Hybrid. At this point, the tech acknowledged that even though this field is labeled as "Exchange", it actually pertains to the environment as described above as well. Unfortunately, there was no technical documentation to back this up, at least that he knew of, but at this point I figured, "What the heck, what will it hurt to try it at this point?!" Hitting Previous in the Azure AD Connect GUI, I then clicked on Customize Synchronization Options, and then Next.

Of course, we must authenticated again:


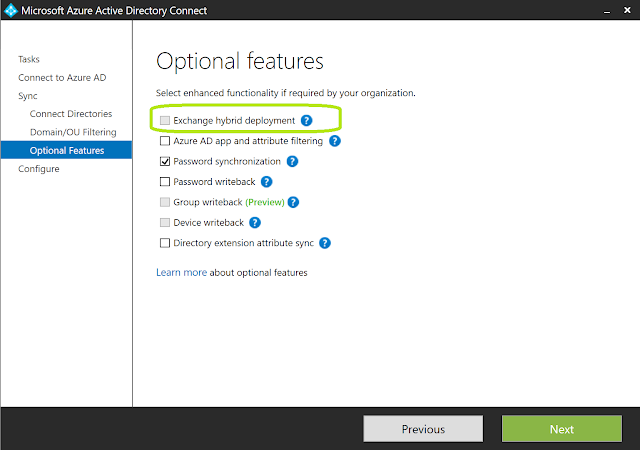
After putting in credentials for Office 365, making sure that your on-prem AD domain is already added in, and skipping on down to the Optional Features tab, you will see that the Exchange hybrid deployment checkbox is not checked. (NOTE: in my lab environment, I do not have Exchange or Skype for Business installed, so this option is Greyed out. In the real-world environment described throughout this post, this option is NOT greyed out.) Check it, and then click Next:


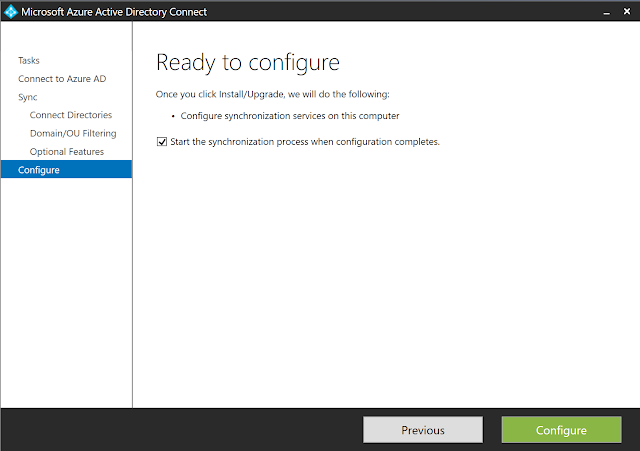
On the Ready to Configure screen, make sure that you leave the checkbox checked for starting a sync, and then click Configure:


When the configuration is complete, just click Exit, as seen below, and wait for the synchronization to finish. Depending on the size of your environment, the synchronization could take a while. I want to say it took at least 15 minutes to re-sync an environment of about 1,400 people with all the new attributes.


Now, I wish I had some big fancy finish to this post, but honestly, the fact is that after I enabled Exchange Hybrid Deployment in Azure AD Connect, all the needed attributes finally synced to Office 365, and I was then able to successfully move users from Online to on-Prem. Honestly, I am still a little skeptical, simply because the setting is so blatantly labeled as "EXCHANGE" Hybrid, but I suppose it wouldn't be the craziest thing I have seen from configuration settings on Microsoft products...

At any rate, if any of you find yourselves in this so-called "Reverse Hybrid" process, and get the 506 Error due to attributes being off, it is likely that your Azure AD Connect config needs to be updated to:

1. Refresh Schema

And/or

2. Enable Exchange Hybrid Deployment checkbox.

Stay techy, my friends!


Thursday, October 6, 2016

UPDATED: Skype for Business Hybrid Handbook, Version 2.1

I have just published Version 2.1 of my FREE eBook on the TechNet Gallery, the Skype for Business Hybrid Handbook. This is a minor revision, with various updates and tweaks throughout the book. Most notably, though, are the updated Features Comparison sections for both Skype for Business Online Cloud PBX, and Exchange Integration.

If you have never grabbed your free copy of the earlier versions of this eBook, you just may find it to be one of the most comprehensive resources for your various Hybrid needs in the Skype for Business world. If you have downloaded a copy in the past, its time to get the most up-to-date version!

https://gallery.technet.microsoft.com/Skype-for-Business-Hybrid-9218205e

As always, feedback is key. Feel free to let me know what you think here, but also don't be shy about leaving a Rating on the TechNet Gallery site!

Stay Techy, My Friends!

Tuesday, August 16, 2016

Cloud Connector Edition (CCE) Deployment - Lessons Learned

Hey everyone! Yes, I know, it has been STUPID long since I wrote a blog post, and my excuses are pathetic. Pathetic as they may be, let me list a couple out to try to redeem myself a bit:
  • I changed jobs. Again! - Yep, I my stay at Deloitte ended up being a little shorter than I originally thought it might be, but an opportunity at Integration Partners came my way, and I just couldn't pass it up. While I worked with an amazing team at Deloitte, and was very grateful for that opportunity, this new role has been a pretty awesome ride already, with an awesome team to boot!
  • I've been keeping up with my weekly #Skype4BRecap webcast. -  Yes, I know, webcasting alone is not good enough, but with a weekly schedule, it does actually take up quite a bit of time!
  • My family did a cross-country move. - You have to admit, that is a pretty big task, moving an entire household from NC to TX. And all the packing/prepping was being done while keeping the house in "Showing" condition for potential buyers.
  • And the lamest excuse of all... I was a bit burned out on "written" material after Version 2.0 of my Skype for Business Hybrid Handbook. - I know, cry me a river, but hey, Version 2.0 was a pretty big increase in content, with an entirely new chapter devoted entirely to Cloud Connector Edition! Which leads me to today's topic.

One of the more recent projects I have had the pleasure to dive into has centered around a Cloud Connector Edition (CCE) deployment. The situation was that the company was deploying a greenfield Skype for Business Online environment in Office 365, meaning they did not already have Skype for Business (or Lync Server) on-prem, and wanted to bake in PSTN calling capability for their Skype for Business users. This was all fine and great for their U.S.-based users, who could simply use Cloud PBX with PSTN Calling. However, this company also had a small group of users in a South American country, and with no PSTN Calling functionality outside of the U.S. and U.K. (ok, AND technically Puerto Rico), they would not be able to place PSTN calls via Skype for Business for their South American users.

Enter CCE! The plan was to move all users into Office 365, with all U.S. users using Cloud PBX with PSTN Calling, and all South American users using Cloud PBX with a new on-prem CCE deployment (the CCE would be connecting to a Sonus SBC as the PSTN Gateway, but that doesn't really matter much for this post). So far, all is well! Below is a nifty little network diagram of how CCE was to be deployed (networking info changed to protect the innocent, of course!):


As you can see above, there was only going to be a single PSTN Site created (a single CCE instance); there was no HA to plan for, or other potential complications. A simple deployment was right up my alley, though, as this would be my first production CCE deployment. I was quite excited.

About those "Lessons Learned"?


Alright, I know you are ready for me to quite blabbing and get on with my pointers already, so I want walk you through this step-by-step - we'll save that for another time! Today is simply about a few lessons that I learned when deploying CCE.

1. Plan your networking ahead of time.


This may seem silly to even call out, as it should be obvious, but I found it really helpful, and almost necessary, to have Visio or other diagram that gave you a good visual of how all the networking components were going to be layed out, and more specifically, what IPs would be assigned. Unlike a Skype for Business Server 2015 on-prem deployment, where you can deploy certain pieces in phases, coming back for things when you are ready, CCE requires you to modify a single text file (CloudConnector.ini) with ALL the necessary values for building out your ENTIRE VM environment before deploying your build script.

This means that you needed to prepare your SSL and have it issued and placed on the server prior to running the script, whereas you could simply execute Step 3 in the Skype for Business Deployment Wizard when you were good and ready for on-prem. You needed to provide the public IP for your Access Edge component, as well as the IPs for each of the 4 VMs, and an additional public-facing (but internal) IP for the Edge server, on a separate network than the 4 IPs assigned to the other VMs. You needed to provide the DNS server IP addresses that your VMs would use for public name resolution (I used Google's public DNS servers at 8.8.8.8 for all public name resolution). As you can see, there were plenty of variables to have completely laid out before pressing that Enter button to execute the PowerShell cmdlet for building the environment.

2. No Errors on the build script doesn't mean everything deployed as expected.


After getting all the requirements gathered and documented in your config file, running it smoothly, and seeing that the cmdlet finished without any errors, you may think the execution was flawless. You may be especially tempted to think this when you see those 4 shiny new VMs in the Hyper-V manager, and start accessing them, noticing the presence of all the right software. Sweetness! Or maybe not so much...

Let's say you go to make that call after getting your user configured completely and logged into a client, and bummer of all bummers, the call doesn't go through. First you try an outbound call from the client, and it doesn't even ring; it pretty much just kills the call after a couple seconds. Then you try an inbound call, dialing the assigned LineURI of this new CCE user. Unfortunately, it may start to ring, but never gets through.

In my case, I ended up installing Skype for Business Debugging Tools on the Mediation server VM, and using CLS Logger. With CLS Logger I could not see any attempts at all when placing an outbound call. Looking at the diagram above, we see that the CCE user would first hit Office 365, and then the call would attempt to route through the Edge role and then the Mediation role before moving on to the SBC (my test users was external to the corporate network). Since I saw nothing on the Mediation server via CLS Logger, this meant that the traffic was only getting as far as the Edge role. I then installed Wireshark on the Edge role, and discovered that a Reset was being sent back to Office 365 from the Edge server every time the outbound call was made.

At the same time I noticed that INBOUND calls were getting further, making it to through the Sonus SBC and to the Mediation server, but were not getting any further as the CLS Logger revealed a 503 error, stating that the Invite failed via the proxy, and that it was unable to establish a connection. With both issues, the Edge server appeared to be the common denominator. This confused me, as I would have figured that any problems with the build would have been reported on the PowerShell window during the build. After all, there wasn't any custom config; all config was done by the script, using the values provided in the config file.Well, I thought I would check out the Edge server for the heck of it.

What do you know, there were several Skype for Business services stopped on the Edge, including the Access Edge service! Trying to start these services failed, and further analysis of the Skype for Business event log showed that the reason for the services not starting was missing certificates. How could this be? The CCE cmdlet succeeded in building the environment, and didn't complain about any certificates...I opened up the Skype for Business Deployment Wizard, go to the certificates section, and sure enough, all of the external certificate fields were blank!

Alright, I don't get how that happened at all, but when I highlighted the External section and clicked "Assign", the external certificate was present as an option. This means that the script did in fact install the certificate on the server, but just didn't assign it during the Skype for Business deployment on the Edge. *SIGH*. I assigned it, restarted services, and BOOM. Traffic started to flow through, and calls started ringing. There were still issues to deal with at the carrier level, but the CCE portion was now fixed.

3. Location, Location, Location (for Office 365 License assignment)


Remember how I said that some of the users in this company were in the US, but others were in South America? Well, when this test account was setup, it was configured like most of the other accounts, leaving the default location as US when assigning licenses. No big deal at first, but remember, I was getting ready to test dialing from with this user, making the assumption that the user was located in this South American country. Well, when I try to dial out international, using the expected format for the specific country, the dialing did not work. At all! Never made it to the Edge server. As a matter of fact, the only way I could dial and make it to the Edge was to start out dialing an E.164 formatted number.

I then used the following cmdlet to view the user's properties:

Get-CsOnlineUser -Identity <user>@<sipdomain>

Looking at the output, I could see that the user's DialPlan was set to "US". Clearly this would not work. So, I went back into the Users section of Office 365, into the Properties for the test user, and went to edit the assigned licenses. When prompted for Location, I changed this to the proper country in South America. After saving the settings, I could now see that the user had the DialPlan that reflected their respective country. Perfect! After waiting about 10 minutes for replication, I signed the user back in, and was able to dial as expected, as if the user was in the South American country.

The thing to remember of this point is that many adopters of CCE are going to be global or international firms that want to make a move into Office 365 for most of their services, but are still not able to move many non-U.S. or non-U.K. users into PSTN Calling; they will be interested in moving as much as they can into Office 365, while leaning on CCE to provide PSTN capabilities to the geographically-dispersed portion of their user base via on-prem infrastructure. With this in mind, specifying the correct location when assigning Office 365 licenses will be very important.

In Summary


Well that's about all the lessons I have to share for now from my recent adventures in CCE. However, I feel like there will be more of these in my future, with maybe other factors to consider, so I may just update this post as I come across any more interesting things to watch for as you wade into the fairly new waters of CCE. Hope this has been helpful in some shape or form. If you have run into any of your own interesting "Gotchas" in a CCE deployment, feel free to share your experience in the Comments section!

Stay techy, my friends!


Sunday, May 1, 2016

Published: Skype for Business Hybrid Handbook, Version 2.0

It's here! Six months after the initial release of the Skype for Business Hybrid Handbook, I have published Version 2.0 to the TechNet Gallery. Oh, and the best part: it's still FREE!


So, what prompted Version 2.0? Well, I knew when I created this book, and had it pointed out afterwards, that I chose an area within the Skype for Business product that would be a frequently changing and evolving beast, which would in turn be difficult to keep up with in book form. This was proven to be very true, and so to keep the content relevant, frequent updates are necessary. The last 6 months have had a large number of fairly major changes in the Skype for Business Hybrid realm, and so it was definitely time to get a new version out there.

What's new?

Azure AD Connect 1.1

Chapter 6 covered the Azure AD Connect portion of configuring a hybrid environment, and with the release of Azure AD Connect 1.1, there were a few changes. Not only were there functional changes, but the screenshots themselves were not fully up to date. On top of this change, the Office 365 Admin Portal Preview is in full swing, so I wanted to get some of those shots in there as well.

Cloud Connector Edition

Cloud Connector Edition was still being called "Min Topology" when the first version of the book was released, and there was much uncertainty about what it would be exactly. All this time later, CCE has been released to General Availability, and people are beginning to kick the tires on it. This was clearly a Skype for Business hybrid scenario that should be accounted for in the book! Here is a preview of one of the diagrams I made for the new Chapter 13 of the of the book:


General House-Cleaning

Besides these more notable updates, there was a lot of grammar cleanup to be done, and just some other rough spots that needed to be smoothed over. Now that Chapter 13 is present, I am sure I will have to go back through and clean up some grammar or punctuation that I missed. That is where all of your awesome feedback comes in handy! ;-)

Well, I hope you are able to use the link above (below the first picture) to grab the latest and most relevant copy, and that it continues to be of use! If you haven't downloaded a copy in the first place, again, it's FREE, and I really appreciate the feedback. If you like it enough, please feel free to share it!

Stay techy, my friends!
Monday, April 11, 2016

Welcome, Skype for Business Cloud Connector Edition

The road has been a bumpy one, but the project formerly referred to as "Min Topology" is finally out of Preview and available for download in General Availability (GA). Everyone, can we please give a warm welcome to the latest member of the Skype for Business Hybrid family, Skype for Business Cloud Connector Edition!

Before I discuss too much about Cloud Connector Edition (CCE), let me provide a few helpful links. I must point out this post is NOT a deep-dive into CCE; rather it is a discussion about what CCE is, and how your organization can take advantage of it. The below links will provide deep-dive information from Microsoft for all the specific requirements and deployment steps.

 First, before you go racing to download it, check out the TechNet article on how to plan for it: https://technet.microsoft.com/en-us/library/mt605227.aspx.

Once you feel like you have a good handle on planning for CCE, read up a bit on how to configure it: https://technet.microsoft.com/en-us/library/mt605228.aspx. That last one doesn't appear to be quite ready for prime time yet, though, as it says that it is "Coming Soon", and refers to the product as still being in Preview. So, one of these days soon, that link will be a bit more useful...

Alright, finally, the link to download CCE: https://www.microsoft.com/en-us/download/details.aspx?id=51693.

Excellent! Now, if you are still reading this, and haven't raced off to start tinkering with CCE, let's talk a bit about the nature of this product. At the heart of this tool is a very specific deployment: CCE addresses a scenario in which all Skype for Business users in your organization are using Skype for Business Online in Office 365, but you have an on-premises voice infrastructure already in place that provides PSTN connectivity. This means that your organization DOES have the on-premises voice infrastructure, but DOES NOT have any Skype for Business infrastructure deployed on-premises; all Skype for Business users are Office 365-based users. Savvy?

Now, of course your users in Skype for Business Online could simply use PSTN services offered by Microsoft through Office 365, assuming they are licensed for Cloud PBX already, but you will also have to pay for the extra voice licensing (in addition to Cloud PBX licensing). If your organization has already invested in the on-premises voice configuration, and still has a contractual obligation to use this infrastructure, it is likely that the most desired approach would be to leverage this on-premises voice infrastructure to provide PSTN connectivity to your Skype for Business Online users. How, you ask, when there is no on-premises Skype for Business deployment to facilitate the needed hybrid configuration that could provide such functionality? This is where Cloud Connector Edition comes in!

Available as a download from Microsoft, CCE is actually a collection of four virtual machines (VMs) that get deployed on a Hyper-V host server in your organization's DMZ network. These four VMs serve as a mini on-premises Skype for Business deployment, but no users will actually be homed on this instance; it exists solely to facilitate connecting the Skype for Business Online Cloud PBX users with your on-premises voice infrastructure to provide PSTN connectivity to them. The four VMs that get deployed and configured via a guided wizard are:

  1. Domain Controller
  2. Central Management Server (CMS)
  3. Mediation Server
  4. Edge Server
Before you become concerned about the Domain Controller component, let me make it clear that this little virtual environment is completely self-contained, including the Domain Controller (DC). That means this DC is deployed in its own brand new forest, and will not be connected to your corporate Active Directory.

The other pieces are fairly obvious, as they put into the place the bare minimum requirements for a functioning Skype for Business deployment that can facilitate the traversal of the media from your Cloud PBX to your on-premises voice infrastructure (thus the previous term, "Min Topology").

Now, what would this look like in your environment? At a very high-level, we can see the overview of traffic flow through CCE to your on-premises voice infrastructure here:


What would a more detailed media flow look like? The below image shows us that our signaling traffic does have to traverse through Office 365 before coming back through our CCE deployment, and then making its way through the gateway and out into the wild PSTN. It seems like this would be less than optimal for audio, though, doesn't it? Luckily, as we can see in the same diagram below, once the signaling traffic verifies the information for the user, that user's media is able to flow directly to the CCE host (completely skipping the Office 365 infrastructure), and on to the on-premises PSTN gateway. Beautiful!


So, would do you think? Is this a pretty cool solution for providing existing on-premises PSTN connectivity to your Skype for Business Online users without having to have a full-blown, licensed, on-premises Skype for Business Server 2015 deployment? I think so!

Like I said, I am not going to go deep on this post in regards to requirements, planning, and detailed deployment; that is all highlighted quite nicely in the Microsoft links provided above. Instead, I hope this post has been helpful in familiarizing you with what Cloud Connector Edition is, how your Office 365-based Skype for Business users can benefit from it, and whether or not this is something your organization needs to explore a bit more deeply. For the consultant crowd, this is certainly a deployment option to gain knowledge on to be ready to pitch it to the customer that is the right fit!

Stay techy, my friends!
Monday, February 29, 2016

Conferencing in Skype for Business: Choosing the Proper Infrastructure

Howdy, UC Enthusiasts!

**Queue the cricket noises**

I know, it has been too long, and my blog has been a little too quiet. The new year saw me ending one job, and starting a new one, so things have been a wee bit busy. Now that I am about a month into my new role, and becoming nicely oriented, I figured it was time to start bringing some fresh content with a fresh perspective! Let's talk Conferencing!


Why is Conferencing is a Critical Component of a UC Strategy?


Depending on the politics involved in deploying Lync or Skype for Business in your organization, conferencing may or may not have been one of the main drivers in the technology decision. While it may be primarily known in your organization as the adopted conferencing tool, Skype for Business may also be mostly known to your end users as the IM system, or the phone solution. Regardless of what it is known for in your company, bringing a positive conferencing experience to meeting attendees is critical to the success of your unified communications strategy, and Skype for Business does an incredible job providing that experience - if you plan appropriately!

A consistent, reliable, simple, and intuitive meeting experience will foster greater collaboration internally, and will ensure that precious employee time is not wasted on trying to navigate confusing and stubborn conferencing software. Providing this experience to external customers or clients can also translate into greater confidence in your organization's ability to work efficiently and effectively for them. Conversely, a poor meeting experience only serves to bring confusion, frustration, inefficiency, and in the case of your valued clients, less confidence that your company has the tools and organization to bring solid results.

If I have now done a decent enough job of convincing you that conferencing is worth putting a little bit of extra consideration into, let's dive into how to make sure you are deploying the proper infrastructure for your intended conferencing participants.

Skype for Business Conferencing Infrastructure Choices


Deploying conferencing in Skype for Business is not equal across all deployments. After all, the infrastructure needs of an SMB will likely vary greatly from those of a large global organization of several thousand end users, right? Is it all just about how many end users you have and how big the rest of your Skype for Business environment needs to be, though? If you guessed "No", then you are correct. While the number of users and scale of your environment will come into play for the size of your conferencing deployment, the type is more specific to the number of attendees that you plan for in your meetings. Let's start out with the most common and simple of choices for your conferencing infrastructure.

Collocated Conferencing - 250 Attendees or Less


Technet calls this scenario a "shared pool", and the idea here is that the Conferencing workload is installed on the same servers, in the same pool, with the other workloads (IM & P, Enterprise Voice, etc.). This will be the deployment method that most organizations are familiar with. As a matter of fact, this deployment method is not restricted to only small and medium size business; it can very well apply to very large Enterprise environments with Enterprise Voice and the whole nine yards.

So, if this option can be used for organizations of all sizes, why would you not just use this option for every deployment? Well, simply put, you would just choose this option - unless you need to hold meetings with more than 250 users. And there it is folks. The "shared pool" deployment method is only appropriate if you plan to only have meetings with less than 250 attendees.

Dedicated Conferencing Pool - 250 to 1,000 Attendees


If your organization has a specific requirement to hold Skype for Business meetings of greater than 250 attendees, but less than 1,000 attendees, then you will not be able to take advantage of the simplicity of a shared pool deployment (i.e., your conferencing workload is collocated on the same server(s) as your IM & P and Enterprise Voice workloads). In this particular situation, you will have to deploy a Dedicated Pool for your Conferencing workload.

A pool that is dedicated to Conferencing is not really much different in configuration; the difference lies in the practice of how this pool is utilized. The goal is to reserve the resources (Memory, CPU, etc) of this pool for large meetings of up to 1,000 attendees, and to meet this goal, it is recommended that almost no users are "homed" on this pool, with the exception of a single SIP-enabled account that is used for scheduling these large meetings. In some cases, a small staff of people may be selected to work closely together on organizing and running these meetings in place of a single generic account, and when this is the case, those users should be homed on the Conferencing pool. Outside of these users, though, no other IM&P or Enterprise Voice workloads should be placed on this pool.

There are a few points to keep in mind with this deployment option:
  • Due to the nature of meetings with such a large attendee list, these meetings are usually meant to have one or two main presenters while the rest of the participants are present in an audience-only capacity.
  • These meetings are usually audio only, with PowerPoint being the main content-sharing mechanism, but with the right controls in place (muting all other users, disabling video for all other users, etc), one or two presenters could also use video.
  • Only one (1) very large meeting at a time should be held, and the best way to control this is by having meetings run through a central SIP-enabled account that is homed on the pool.
  • There is no in-band method for scheduling these meetings, so an out-of-band process needs to be implemented for coordinating times for these meetings. This is especially important if more than one SIP-enabled account is homed on the Dedicated Pool and is capable of running these large meetings.

Skype Meeting Broadcast - Up to 10,000 Attendees


So, there are conferencing solutions for up to 1,000 users using an on-premises Skype for Business Server 2015 infrastructure, but what if you have a need to hold a meeting for more than 1,000 users? Well, you are in luck, so long as you don't plan on having more than 10,000 total attendees. Oh, and so long as you are willing to configure a Hybrid deployment with Skype for Business Online in Office 365. Yeah, just a small detail there...

The reason you have to have Hybrid to accomplish meetings on this scale is that Skype Meeting Broadcast is actually a component of Skype for Business Online; it does not exist in Skype for Business Server 2015 in any capacity. Really, the main reason you would want to use this option, aside from achieving audiences greater than 1,000 and up 10,000, is because it provides you that Broadcast-functionality. With one or two presenters, the goal here is to reach a wide audience with a one-way presentation, potentially inside and outside your audience, and to record it for providing the content to others after the broadcast. This is a great option for conducting "Town Hall Discussions" in a large organization that is very geographically dispersed!

Microsoft Mechanics Episode on Skype Meeting Broadcast: https://www.youtube.com/watch?v=wLWpAEH2cyI.

If your organization has not even considered "Hybrid" yet, there is no need to get too stressed out about this. Yes, there will be some leg work and planning involved to configure your on-premises infrastructure (and your S4B Online tenant) for Hybrid, but it is nothing overwhelming, or terribly costly. You essentially will just need one or two SIP-enabled accounts to be homed in Skype for Business Online for configuring and organizing the meetings. These accounts will have to have the proper licensing assigned to use the Skype Meeting Broadcast feature, obviously, but once it is all setup, there is a simple dashboard for configuring these meetings, and scheduling them. This streamlines management.

Conclusion


As you can see, depending on your audience requirements, you may have to do a little more planning than the typical Skype for Business Server 2015 install. Luckily, the options are fairly straightforward, and there is not a great deal of technical complexity in the differences between your options. Plan, Plan some more, and then PLAN again. If you do this, you will achieve great Conferencing experience for all your audience members, employees and customers alike!

Stay techy, my friends!
Friday, December 4, 2015

Configure Hybrid Skype for Business and Move Users (GUI)

In an earlier post, Configure Hybrid In Your Skype  for Business Environment, I discussed the pre-requisites for setting up a Hybrid environment, and then walked through the configuration via PowerShell. In this post I will be demonstrating the Hybrid configuration and moving of users between environments all from the GUI within the Skype for Business Control Panel. To view details about the environment and the needed pre-reqs, please visit the blog post referenced above.

Configure Hybrid


Assuming that you have already satisfied all the pre-requisites per the blog post mentioned above, it is now time to connect your environments using the provided wizard in the Skype for Business Control Panel (on-premises).

From the Skype for Business Control Panel, on the Home tab, click the Set up hybrid with Skype for Business Online link as shown below: 


The Set up Hybrid with Skype for Business Online wizard will open, and the first screen simply presents a list of pre-requisites that must be satisfied. Click Next.


The next screen will likely prompt you to sign in to Office 365. Click the Sign in to Office 365 button.


Enter your credentials, and then click Ok.


You will then see that the wizard is attempting to sign in to Office 365 with the provided credentials.

The next screen will show that you are successfully signed in to Office 365 if your credentials were correct, and you can click Close.

The next wizard screen seems a bit repetitive, but it confirms that you are now signed in to Office 365. Click Next.


Now the wizard will actually perform a check to see if the pre-requisites have been satisfied. 


If any checks come back with an "X" in a red circle, no problem. Just click Next, and the wizard will take care of the needed configuration. As you can see, all pre-requisites were taken care of. The image below reflects that the "Federation with Office 365 is not configured" error in the above image was automatically configured for you. Click Close.


Wasn't that easy? Hybrid is now configured!

Move Users From On-Prem to Online


Now navigate to the Users tab in the Skype for Business Control Panel. Select the user that you want to move to Skype for Business Online, and then click on the Actions drop-down from the top navigation menu. Select the option to Move selected users to Skype for Business Online....


The Move users to Skype for Business Online wizard opens, and you are presented with a warning to make sure that the user has a Skype for Business Online license assigned in Office 365, and with another warning to make sure that you are familiar with the feature differences between environments. (NOTE: if you need to assign a license to the user in Skype for Business Online at this point, stop and do so. Then go grab a coffee from Starbucks; I have seen provisioning take between 30 - 60 minutes for this license assignment to be recognized from the Control Panel.) Click Next.


Again, you may be prompted to sign in to Office 365. If so, enter your credentials, and click Ok. Once you are signed in, click Close.


Repetition. More confirmation that you are signed in to Office 365. Click Next.


You are now presented with another prompt asking if you are sure you want to move this user to Skype for Business Online. Click Next.


Next, a screen appears displaying the progress of the move operation.


Once the move completes successfully, you will see the below screen. This would show if the move was unsuccessful for any reason (like licensing not being recognized yet). This report can be more helpful in cases where you are moving multiple users. Click Close.


Now, if you look at your users in the Control Panel, you can see that Shaggy and Thelma are still homed in the on-prem pool, but Scooby is now in Skype for Business Online.


Again, Provisioning may take its sweet time for your Skype for Business Admin Center to reflect this new user as being homed Online, but once it has finished, you should see this on your Skype for Business Admin Center dashboard:


Clicking on the Users tab in the Skype for Business Admin Center further confirms that Scooby is now indeed Online.


Back in the on-prem Control Panel, if we open the Properties of Scooby, and read the message, it hits the point home just a bit further that he is definitely homed in Office 365.


Move Users from Online to On-Prem


Alright, so you have moved a user to Online. Before they get too comfy, let's move them back to on-prem!

From the on-prem Skype for Business Control Panel, navigate to the Users tab, search for your user, and with the user highlighted, click on the Actions drop-down menu. Select the option to Move selected users from Skype for Business Online...


In the Move users to Skype for Business Server on-premises wizard, you are prompted to select the pool that you want to move the user to. Make your selection from the drop-down box, and then click Next.


This operation requires you to connect to Office 365 once again, so click the Sign in to Office 365 button, enter your credentials, click Ok, and then once you are signed in, click Close


You will receive the expected confirmation window stating that you are now signed into Office 365 as was demonstrated above. Click Next. The next screen is asking you to confirm that you want to move this user to your on-prem pool. Click Next.


Again, you are presented with the progress of the move operation.


Lastly, you will see the results screen. In our case, you can see that Scooby moved back successfully. Click Close.


Now, if we take another look at all of our users, we can see that they are all back nice and snug in our on-prem pool. 


And that's it! Once your pre-reqs are in place and Directory Synchronization is working, configuring Hybrid and moving users between environments is very simple and straightforward from the Skype for Business Control Panel.

Stay techy, my friends!