Showing posts with label Hybrid S4B. Show all posts

Tuesday, August 16, 2016

Cloud Connector Edition (CCE) Deployment - Lessons Learned

Hey everyone! Yes, I know, it has been STUPID long since I wrote a blog post, and my excuses are pathetic. Pathetic as they may be, let me list a couple out to try to redeem myself a bit:
  • I changed jobs. Again! - Yep, I my stay at Deloitte ended up being a little shorter than I originally thought it might be, but an opportunity at Integration Partners came my way, and I just couldn't pass it up. While I worked with an amazing team at Deloitte, and was very grateful for that opportunity, this new role has been a pretty awesome ride already, with an awesome team to boot!
  • I've been keeping up with my weekly #Skype4BRecap webcast. -  Yes, I know, webcasting alone is not good enough, but with a weekly schedule, it does actually take up quite a bit of time!
  • My family did a cross-country move. - You have to admit, that is a pretty big task, moving an entire household from NC to TX. And all the packing/prepping was being done while keeping the house in "Showing" condition for potential buyers.
  • And the lamest excuse of all... I was a bit burned out on "written" material after Version 2.0 of my Skype for Business Hybrid Handbook. - I know, cry me a river, but hey, Version 2.0 was a pretty big increase in content, with an entirely new chapter devoted entirely to Cloud Connector Edition! Which leads me to today's topic.

One of the more recent projects I have had the pleasure to dive into has centered around a Cloud Connector Edition (CCE) deployment. The situation was that the company was deploying a greenfield Skype for Business Online environment in Office 365, meaning they did not already have Skype for Business (or Lync Server) on-prem, and wanted to bake in PSTN calling capability for their Skype for Business users. This was all fine and great for their U.S.-based users, who could simply use Cloud PBX with PSTN Calling. However, this company also had a small group of users in a South American country, and with no PSTN Calling functionality outside of the U.S. and U.K. (ok, AND technically Puerto Rico), they would not be able to place PSTN calls via Skype for Business for their South American users.

Enter CCE! The plan was to move all users into Office 365, with all U.S. users using Cloud PBX with PSTN Calling, and all South American users using Cloud PBX with a new on-prem CCE deployment (the CCE would be connecting to a Sonus SBC as the PSTN Gateway, but that doesn't really matter much for this post). So far, all is well! Below is a nifty little network diagram of how CCE was to be deployed (networking info changed to protect the innocent, of course!):


As you can see above, there was only going to be a single PSTN Site created (a single CCE instance); there was no HA to plan for, or other potential complications. A simple deployment was right up my alley, though, as this would be my first production CCE deployment. I was quite excited.

About those "Lessons Learned"?


Alright, I know you are ready for me to quite blabbing and get on with my pointers already, so I want walk you through this step-by-step - we'll save that for another time! Today is simply about a few lessons that I learned when deploying CCE.

1. Plan your networking ahead of time.


This may seem silly to even call out, as it should be obvious, but I found it really helpful, and almost necessary, to have Visio or other diagram that gave you a good visual of how all the networking components were going to be layed out, and more specifically, what IPs would be assigned. Unlike a Skype for Business Server 2015 on-prem deployment, where you can deploy certain pieces in phases, coming back for things when you are ready, CCE requires you to modify a single text file (CloudConnector.ini) with ALL the necessary values for building out your ENTIRE VM environment before deploying your build script.

This means that you needed to prepare your SSL and have it issued and placed on the server prior to running the script, whereas you could simply execute Step 3 in the Skype for Business Deployment Wizard when you were good and ready for on-prem. You needed to provide the public IP for your Access Edge component, as well as the IPs for each of the 4 VMs, and an additional public-facing (but internal) IP for the Edge server, on a separate network than the 4 IPs assigned to the other VMs. You needed to provide the DNS server IP addresses that your VMs would use for public name resolution (I used Google's public DNS servers at 8.8.8.8 for all public name resolution). As you can see, there were plenty of variables to have completely laid out before pressing that Enter button to execute the PowerShell cmdlet for building the environment.

2. No Errors on the build script doesn't mean everything deployed as expected.


After getting all the requirements gathered and documented in your config file, running it smoothly, and seeing that the cmdlet finished without any errors, you may think the execution was flawless. You may be especially tempted to think this when you see those 4 shiny new VMs in the Hyper-V manager, and start accessing them, noticing the presence of all the right software. Sweetness! Or maybe not so much...

Let's say you go to make that call after getting your user configured completely and logged into a client, and bummer of all bummers, the call doesn't go through. First you try an outbound call from the client, and it doesn't even ring; it pretty much just kills the call after a couple seconds. Then you try an inbound call, dialing the assigned LineURI of this new CCE user. Unfortunately, it may start to ring, but never gets through.

In my case, I ended up installing Skype for Business Debugging Tools on the Mediation server VM, and using CLS Logger. With CLS Logger I could not see any attempts at all when placing an outbound call. Looking at the diagram above, we see that the CCE user would first hit Office 365, and then the call would attempt to route through the Edge role and then the Mediation role before moving on to the SBC (my test users was external to the corporate network). Since I saw nothing on the Mediation server via CLS Logger, this meant that the traffic was only getting as far as the Edge role. I then installed Wireshark on the Edge role, and discovered that a Reset was being sent back to Office 365 from the Edge server every time the outbound call was made.

At the same time I noticed that INBOUND calls were getting further, making it to through the Sonus SBC and to the Mediation server, but were not getting any further as the CLS Logger revealed a 503 error, stating that the Invite failed via the proxy, and that it was unable to establish a connection. With both issues, the Edge server appeared to be the common denominator. This confused me, as I would have figured that any problems with the build would have been reported on the PowerShell window during the build. After all, there wasn't any custom config; all config was done by the script, using the values provided in the config file.Well, I thought I would check out the Edge server for the heck of it.

What do you know, there were several Skype for Business services stopped on the Edge, including the Access Edge service! Trying to start these services failed, and further analysis of the Skype for Business event log showed that the reason for the services not starting was missing certificates. How could this be? The CCE cmdlet succeeded in building the environment, and didn't complain about any certificates...I opened up the Skype for Business Deployment Wizard, go to the certificates section, and sure enough, all of the external certificate fields were blank!

Alright, I don't get how that happened at all, but when I highlighted the External section and clicked "Assign", the external certificate was present as an option. This means that the script did in fact install the certificate on the server, but just didn't assign it during the Skype for Business deployment on the Edge. *SIGH*. I assigned it, restarted services, and BOOM. Traffic started to flow through, and calls started ringing. There were still issues to deal with at the carrier level, but the CCE portion was now fixed.

3. Location, Location, Location (for Office 365 License assignment)


Remember how I said that some of the users in this company were in the US, but others were in South America? Well, when this test account was setup, it was configured like most of the other accounts, leaving the default location as US when assigning licenses. No big deal at first, but remember, I was getting ready to test dialing from with this user, making the assumption that the user was located in this South American country. Well, when I try to dial out international, using the expected format for the specific country, the dialing did not work. At all! Never made it to the Edge server. As a matter of fact, the only way I could dial and make it to the Edge was to start out dialing an E.164 formatted number.

I then used the following cmdlet to view the user's properties:

Get-CsOnlineUser -Identity <user>@<sipdomain>

Looking at the output, I could see that the user's DialPlan was set to "US". Clearly this would not work. So, I went back into the Users section of Office 365, into the Properties for the test user, and went to edit the assigned licenses. When prompted for Location, I changed this to the proper country in South America. After saving the settings, I could now see that the user had the DialPlan that reflected their respective country. Perfect! After waiting about 10 minutes for replication, I signed the user back in, and was able to dial as expected, as if the user was in the South American country.

The thing to remember of this point is that many adopters of CCE are going to be global or international firms that want to make a move into Office 365 for most of their services, but are still not able to move many non-U.S. or non-U.K. users into PSTN Calling; they will be interested in moving as much as they can into Office 365, while leaning on CCE to provide PSTN capabilities to the geographically-dispersed portion of their user base via on-prem infrastructure. With this in mind, specifying the correct location when assigning Office 365 licenses will be very important.

In Summary


Well that's about all the lessons I have to share for now from my recent adventures in CCE. However, I feel like there will be more of these in my future, with maybe other factors to consider, so I may just update this post as I come across any more interesting things to watch for as you wade into the fairly new waters of CCE. Hope this has been helpful in some shape or form. If you have run into any of your own interesting "Gotchas" in a CCE deployment, feel free to share your experience in the Comments section!

Stay techy, my friends!


Friday, December 4, 2015

Configure Hybrid Skype for Business and Move Users (GUI)

In an earlier post, Configure Hybrid In Your Skype  for Business Environment, I discussed the pre-requisites for setting up a Hybrid environment, and then walked through the configuration via PowerShell. In this post I will be demonstrating the Hybrid configuration and moving of users between environments all from the GUI within the Skype for Business Control Panel. To view details about the environment and the needed pre-reqs, please visit the blog post referenced above.

Configure Hybrid


Assuming that you have already satisfied all the pre-requisites per the blog post mentioned above, it is now time to connect your environments using the provided wizard in the Skype for Business Control Panel (on-premises).

From the Skype for Business Control Panel, on the Home tab, click the Set up hybrid with Skype for Business Online link as shown below: 


The Set up Hybrid with Skype for Business Online wizard will open, and the first screen simply presents a list of pre-requisites that must be satisfied. Click Next.


The next screen will likely prompt you to sign in to Office 365. Click the Sign in to Office 365 button.


Enter your credentials, and then click Ok.


You will then see that the wizard is attempting to sign in to Office 365 with the provided credentials.

The next screen will show that you are successfully signed in to Office 365 if your credentials were correct, and you can click Close.

The next wizard screen seems a bit repetitive, but it confirms that you are now signed in to Office 365. Click Next.


Now the wizard will actually perform a check to see if the pre-requisites have been satisfied. 


If any checks come back with an "X" in a red circle, no problem. Just click Next, and the wizard will take care of the needed configuration. As you can see, all pre-requisites were taken care of. The image below reflects that the "Federation with Office 365 is not configured" error in the above image was automatically configured for you. Click Close.


Wasn't that easy? Hybrid is now configured!

Move Users From On-Prem to Online


Now navigate to the Users tab in the Skype for Business Control Panel. Select the user that you want to move to Skype for Business Online, and then click on the Actions drop-down from the top navigation menu. Select the option to Move selected users to Skype for Business Online....


The Move users to Skype for Business Online wizard opens, and you are presented with a warning to make sure that the user has a Skype for Business Online license assigned in Office 365, and with another warning to make sure that you are familiar with the feature differences between environments. (NOTE: if you need to assign a license to the user in Skype for Business Online at this point, stop and do so. Then go grab a coffee from Starbucks; I have seen provisioning take between 30 - 60 minutes for this license assignment to be recognized from the Control Panel.) Click Next.


Again, you may be prompted to sign in to Office 365. If so, enter your credentials, and click Ok. Once you are signed in, click Close.


Repetition. More confirmation that you are signed in to Office 365. Click Next.


You are now presented with another prompt asking if you are sure you want to move this user to Skype for Business Online. Click Next.


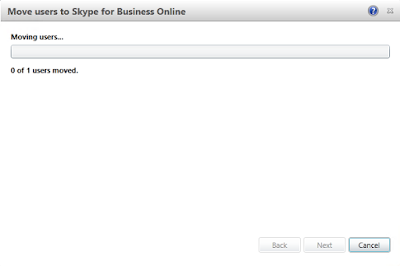
Next, a screen appears displaying the progress of the move operation.


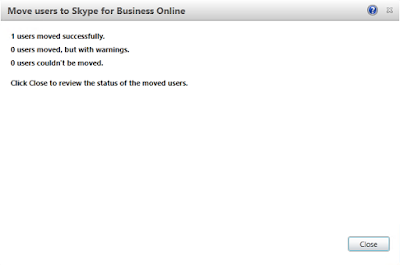
Once the move completes successfully, you will see the below screen. This would show if the move was unsuccessful for any reason (like licensing not being recognized yet). This report can be more helpful in cases where you are moving multiple users. Click Close.


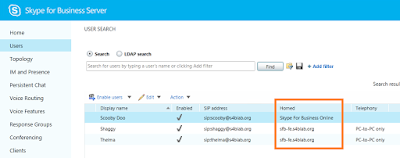
Now, if you look at your users in the Control Panel, you can see that Shaggy and Thelma are still homed in the on-prem pool, but Scooby is now in Skype for Business Online.


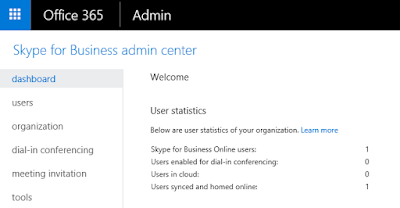
Again, Provisioning may take its sweet time for your Skype for Business Admin Center to reflect this new user as being homed Online, but once it has finished, you should see this on your Skype for Business Admin Center dashboard:


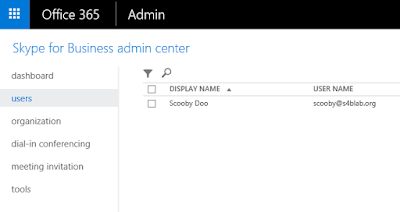
Clicking on the Users tab in the Skype for Business Admin Center further confirms that Scooby is now indeed Online.


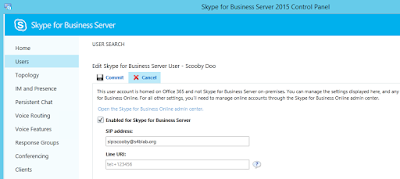
Back in the on-prem Control Panel, if we open the Properties of Scooby, and read the message, it hits the point home just a bit further that he is definitely homed in Office 365.


Move Users from Online to On-Prem


Alright, so you have moved a user to Online. Before they get too comfy, let's move them back to on-prem!

From the on-prem Skype for Business Control Panel, navigate to the Users tab, search for your user, and with the user highlighted, click on the Actions drop-down menu. Select the option to Move selected users from Skype for Business Online...


In the Move users to Skype for Business Server on-premises wizard, you are prompted to select the pool that you want to move the user to. Make your selection from the drop-down box, and then click Next.


This operation requires you to connect to Office 365 once again, so click the Sign in to Office 365 button, enter your credentials, click Ok, and then once you are signed in, click Close


You will receive the expected confirmation window stating that you are now signed into Office 365 as was demonstrated above. Click Next. The next screen is asking you to confirm that you want to move this user to your on-prem pool. Click Next.


Again, you are presented with the progress of the move operation.


Lastly, you will see the results screen. In our case, you can see that Scooby moved back successfully. Click Close.


Now, if we take another look at all of our users, we can see that they are all back nice and snug in our on-prem pool. 


And that's it! Once your pre-reqs are in place and Directory Synchronization is working, configuring Hybrid and moving users between environments is very simple and straightforward from the Skype for Business Control Panel.

Stay techy, my friends!

Tuesday, December 1, 2015

New eBook Annoucement: Skype for Business Hybrid Handbook

Good morning, everyone, and Happy December! Today is a big day, both for me, and for Skype for Business and Office 365. Today, Office 365 begins selling their brand new premium license: E5, making Cloud PBX with PSTN Calling Generally Available. On my side of things, I am launching a new, free, e-book titled, Skype for Business Hybrid Handbook!


I planned the launch of this book to fall closely in line with the arrival of E5 and Cloud PBX, as I feel that this new subscription option will really bolster the implementation of Hybrid models across many organizations. The fact that I finished in time to actually launch on the same day is just icing on the cake to me!

For now, this ebook is available exclusively in the Technet Gallery. It is 100% FREE, and will remain so, at least for this first edition. To download your own copy, whether for educational purposes or for a handy resource to guide you in your own Hybrid Skype for Business efforts, visit the Technet Gallery: https://gallery.technet.microsoft.com/Skype-for-Business-Hybrid-9218205e.

As with all my community contributions, I am one of the most open individuals to thoughts and feedback that there is. So, with that in mind, I would GREATLY appreciate your thoughts. Accolades, constructive criticism, and outright sarcasm are all welcome!

For a preview of the structure of the book, below are the included chapters and sub-sections:


Terminology Review.. 6
Chapter 1: Introduction to Skype for Business Environments. 7
     - Skype for Business Server 2015 (On-Premises)
     - Skype for Business Online. 9
Chapter 2: On-Premises vs. Online: Feature Comparison. 11
Chapter 3: Supported Hybrid Configurations and Available Features. 13
     - Exchange Server On-Premises Integration
     - Exchange Online Integration
     - SharePoint ServerOnPremises Integration
     - SharePoint Online Integration. 16
Chapter 4: Hybrid Prerequisites and Requirements. 18
     - Skype for Business Online Management with PowerShell 18
     - On-Prem Infrastructure Requirements. 19
     - Supported (Required) Topologies. 19
     - Federation in a Hybrid Environment. 20
     - DNS and Port Requirements. 20
Chapter 5: User Data, Features, and Policy Limitations. 21
     - Notes About User Data. 21
     - Notes About Policies. 21
Chapter 6: Configure Directory Synchronization with Azure AD Connect. 23
Chapter 7: Set Up Federation with Skype for Business Online Tenant. 33
     - GUI-Based: Set up Hybrid with Skype for Business Online Wizard. 33
     - PowerShell-Based: Configure Federation with the Management Shell 34
     - Federating with an Audio Conferencing Provider. 39
Chapter 8: Move Users from On-Prem to Skype for Business Online. 40
     - Pilot Users First. 42
     - Move Users in the Control Panel 42
     - Move Users in the Management Shell (PowerShell). 43
Chapter 9: User Management in a Hybrid Environment. 49
Chapter 10: Deploy Hybrid in a Multi-Forest Environment. 52
     - Forest Topology. 52
     - Forest Trusts. 54
     - Hybrid User Placement Considerations. 54
     - Notes on AD FS Configuration. 54
     - Notes on Azure Active Directory Connect. 57
Chapter 11: Configure Hybrid in Reverse: Online-to-On-Prem.. 60
Chapter 12: Cloud PBX with PSTN Connectivity via On-Premises Environment. 64
     - Feature Comparison. 64
     - Enabling a User for Cloud PBX with PSTN Connectivity. 65
     - Configure & Assign Voice Routing Policy. 65
     - Assign Licensing in Office 365. 66
     - Move the User to Skype for Business Online. 68
     - Enable for Enterprise Voice and Cloud PBX Voicemail

I hope you have a chance to download a copy for yourself, and more importantly, I hope it is useful in your pursuit of a Hybrid environment!

Stay techy, my friends!

Thursday, October 29, 2015

Configure Hybrid In Your Skype for Business Environment

Hybrid is becoming a huge buzzword. Hybrid Cloud. Hybrid Cars. Hybrid everything! And each is "hybrid" in a different context. Today, I want to discuss implementing Hybrid in a Skype for Business environment.

In addition to seeking guidance on configuring your hybrid deployment with the content from this blog post, be sure to also download a FREE copy of my Hybrid Handbook eBook on the TechNet Gallery: https://gallery.technet.microsoft.com/Skype-for-Business-Hybrid-9218205e. It will provide guidance on various Skype for Business "Hybrid" topics.

What exactly does Skype for Business Hybrid mean? Well, simply put, Hybrid within your Skype for Business deployment is when you have an On-Prem Skype for Business Server 2015 (or Lync Server 2013) deployment, AND Skype for Business Online (Office 365), and you want to connect the two environments. This way you can have some users in your On-Prem environment and others in your Online environment, while they are all part of the same SIP domain, and communicate freely as if they were all in the same physical deployment.

Why Skype for Business Hybrid?


This is a fair question. Why add the complexity to an already deployed Skype for Business Server 2015 deployment? Or the reverse: why complicate your simple Skype for Business Online environment with a whole new On-Prem deployment? Here are a few key reasons:
  1. Flexibility. In today's work environment, users are scattered geographically, and also have varying functionality needs. While some can operate fully within the available feature set of Skype for Business Online, others may need more enterprise-level features that are only found in On-Prem, such as advanced Enterprise Voice functionality.
  2. Cost Savings. By having some Skype for Business users remain cloud-based, you save significantly on licensing costs compared to those users that are on-prem.
  3. Leaner On-Prem Environment. This is kind of tied in with the previous two comments, but the more users you have in Office 365, the less beefy your on-Prem deployment has to be. This goes beyond Skype for Business, as well. If those Office 365 users are also using Exchange Online, or SharePoint Online, those On-Prem deployments can also likely be scaled down over time.
Again, the above points are just a few obvious reasons why a company might want a Hybrid environment. Now that we have taken a quick look at why, let's explore our existing lab environment, and discuss the leg work that was done before we made the actual connection between environments and moved a user to Online.

The Lab Environment


The On-Prem lab environment was built in the Rackspace public cloud, which was very easy to deploy and manage (Disclaimer: for those that don't know, I am a Rackspace employee). It consists of the following servers:


  • 1 Active Directory Domain Controller
  • 1 Azure AD Connect Server for Directory Synchronization
  • 1 Active Directory Federation Services Server
  • 1 AD FS Web Proxy
  • 1 Skype for Business Server 2015 Standard Edition Front End
  • 1 Skype for Business Server 2015 Edge Server
  • 1 Reverse Proxy (IIS w/ ARR)


For the certificates on the Skype for Business components, I installed an internal Root CA on the DC, and have used that on both the public and private-facing certificates, which works fine for the lab. For the AD FS and AD Connect pieces, I set them up according to this previous blog post: http://blog.msucguy.com/2015/07/configuring-azure-ad-connect-with-sso.html.

The Skype for Business On-Prem deployment is just a run-of-the-mill Standard Edition deployment, with three users enabled, nothing special:


As you can see, we are going with a Scooby Doo theme, here!

The Office 365 Environment


My tenant for this lab is using the SIP domain 's4blab.org', which is of course the same SIP domain that I used in my On-Prem lab. As you can see, to begin, I had only my 'admin' user, and no SSO or directory synchronization setup. I am not going to walk through those steps, as they are out of scope for this post, but you can find those steps in the blog post I linked to above. 


In the Azure AD portal, you can see that my domain is already verified, but SSO is not yet impletementd:


Next, in our Licenses section, we can see that I have a single valid Skype for Business Online (Plan 2) license, but that it is not yet assigned:


After I activated my domain for Directory Synchronization, we see this for Step 3:


Then, once I got directory synchronization in place with SSO, we can see that Scooby, Shaggy, and Thelma, as well as my AD FS service account, are now synced to the cloud, but their Status shows "Synced with Active Directory". Good times.


When I go back into Azure AD Portal, I can now see that my one verified domain is also configured for SSO:


Alright, for a last look at the Office 365 environment before we move on to actually connecting the Hybrid piece, we can see that there are still no Skype for Business Online users enabled in the Skype for Business Admin Center after our Directory Synchronization:

Prerequisites for Hybrid Skype for Business


Let's first discuss a few key requirements that must be in place before Hybrid can be successfully implemented.
  • Directory Synchronization. A mechanism for directory synchronization between your on-prem Active Directory and Azure AD instance is required. This does not have to be Azure AD Connect, but I would highly recommend it. Also, if SSO is required, you will need to have AD FS with the AD FS Web Proxy configured. As mentioned above, this is already in place in our lab environment.
  • On-Prem Topology. In order to set this up, you cannot have a mix-and-match topology. For a Skype for Business Server 2015 deployment, all servers must be running Skype for Business Server 2015. Likewise, if you have a Lync Server 2013 deployment, all servers must be running Lync Server 2013. 
  • Federation Requirements. The Federation configuration that is in place in your on-prem deployment must be mirrored in your Online environment. For example, if you have Open Federation set up on-Prem, but lock down federation to only certain domains Online, you will have to change one or the other to match the other exactly.
  • DNS. The SRV records for your SIP domain, both _sipfederationtls._tcp and _sip._tls, need to be configured to point to the on-prem Reverse Proxy, NOT the Office 365 addresses.
  • Other Considerations. There are also various requirements for ports and protocols that need to be allowed through your firewall. In addition, there are a few more things that you need to consider, but are not necessarily requirements, regarding user accounts and data, and policies and features. Read up on each of these pieces in detail here: https://technet.microsoft.com/en-us/library/jj205403.aspx.


Configure Hybrid


Edit (12/4/2015): The next two sections describe how to configure hybrid and move users via Powershell cmdlets, so that you have a base to work off for putting scripts together and further automating your environment. For a great How-To on completing these tasks within the Skype for Business Control Panel, check out my other post: Configure Hybrid Skype for Business and Move Users (GUI).

Alright, with our environment fully prepped, and ready for connecting, let's jump into the meat of actually making the Hybrid connection, and then move on to moving users.

  1. So, first, we need to run the following cmdlet in our Skype for Business Management Shell on the on-prem Front End: Set-CSAccessEdgeConfiguration -AllowOutsideUsers 1 -AllowFederatedUsers 1 -UseDnsSrvRouting -EnablePartnerDiscovery $true. 
    As you can see, I first tried running it without -EnablePartnerDiscovery, as that is what was instructed in official documentation, but this parameter is apparently required when using -UseDnsSrvRouting. Note: You can also set the value as $false, but I chose $true to keep things simplified across both environments.
  2. Now, in the Federation and External Access tab within the Skype for Business Server Control Panel, go to the section titled SIP FEDERATED PROVIDERS, and remove the default entry that shows up for Skype for Business Online. You will then only have one default entry. 
  3. Back in the Skype for Business Management Shell, run the following cmdlet: New-CsHostingProvider -Identity SkypeforBusinessOnline -ProxyFqdn -"sipfed.online.lync.com" -Enabled $true -EnabledSharedAddressSpace $true -HostsOCSUsers $true -VerificationLevel UseSourceVerification -IsLocal $false -AutodiscoverUrl https://webdir.online.lync.com/AutodiscoverService.svc/root. The -EnabledSharedAddressSpace is important because this tells the on-prem deployment that we will be sharing the SIP domain that is in use with an Online tenant. 
  4. Going back to the Control Panel, we can see our new hosting provider if we refresh the screen: 
  5. Next, if we don't already have the Skype for Business Online connector module installed, you must obtain that and install in on your server. If you are using your Skype for Business Front End server to run these commands, however, this module should have been installed by default when installing Skype for Business Server 2015.
  6. Import the module (Import-Module SkypeOnlineConnector), and then set your credentials in the $cred variable ($cred = Get-Credential): 
  7. Next, run this cmdlet to set a new $CSSession variable: $CSSession = New-CsOnlineSession -Credential $cred; follow that cmdlet up with Import-PSSession $CSSession -AllowClobber
  8. Now, just like we configured our Hosting Provider to Share Address Space, we need to set this on our actual tenant in Office 365: Set-CsTenantFederationConfiguration -SharedSipAddressSpace $true

Alright, we are ready to move a user from our on-prem Skype for Business deployment to our Skype for Business Online tenant!

Move Users From On-Prem to Online


Alright, the documentation has us move on to running the cmdlet for move the user. However, if we do this before we set the Skype for Business Online (Plan 2) license on the user within Office 365, we will see the below error: 


The error tells us: "The user could not be moved because he or she has not been assigned a Skype for Business Online license. Users must be licensed before they can be moved to Skype for Business Online." Pretty straightforward, right!

So, we go to the user in Office 365 Admin Center, under the Active Users section, and selecting Scooby (you will notice we tried to move Scooby in the above screenshot) shows us that he has no license assigned:

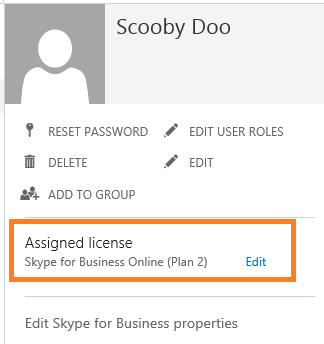
So, we click on the Edit link next to the text "No license" under Assigned License, and in the Assign License box, we select "United States" in the Set user location dropdown box, and then check the box for Skype for Business Online (Plan 2). Click Save.


We can now see that the user Scooby has a Skype for Business Online (Plan 2) license assigned. 


However, if you attempt to run the Move-CsUser command again immediately, you may still see the same error, which doesn't make sense, right?! Well, you may need to wait 15 - 30 minutes after assigning this license, as the provisioning process is not exactly what you might call...quick.

SO, after waiting all this time, you can now run this again: Move-CsUser -Identity scooby@s4blab.org -Target sipfed.online.lync.com -Credential $cred -HostedMigrationOverrideUrl https://admin1a.online.lync.com/HostedMigration/hostedmigrationservice.svc.

**IMPORTANT** In the above command, you first need to make sure you change -Identity to the user that you are attempting to move. Second, in order to get the proper HostedMigrationOverrideUrl, log into your Skype for Business Admin Center, and copy the URL up through ".lync.com", and then append "/HostedMigration/hostedmigrationservice.svc" to the end of that URL. This may be different for different tenants.

You will then be prompted to Confirm. Type "y" and hit Enter. You should then see the below if it was successful:


Again, provisioning is involved at this point, so after you run Move-CsUser, you may need to wait a while before you see the below stats get updated in your Skype for Business Admin Center:


Then, if you click on the Users tab in the Skype for Business Admin Center, you should now see good ol' Scooby in there!


Let's go take a quick look back at the Active Users in our on-prem Skype for Business Control Panel. Doing so shows us that Scooby is no longer there, as he now lives in the Cloud!


Lastly, let's now log in to a Skype for Business Basic client with Scooby. BOOM! Not only did Scooby log in, but his contacts migrated with him (up to 250 contacts can be migrated). Also, Scooby's last status  of "Yipes!" is still up top. Nice!


Now, if you are wondering why Shaggy and Thelma's Presence shows as Updating, it is because of that private Root CA that I mentioned earlier. Since I am not using trusted public certificates in my lab, Skype for Business Online does not trust the certs, and thus the federation relationship for communication and presence does not work. For a lab, this is no big deal, but in Production, with publicly-issued SSL certificates, you will be able to communicate and see Presence.

Well, I hope this helps to clear up the process for some of you that ran into similar errors as I saw above, and I hope this lays a foundation for you to begin planning your Hybrid environments! As always, I welcome feedback, thoughts, and suggestions!

Stay techy, my friends!