Showing posts with label Azure AD Connect. Show all posts

Monday, October 31, 2016

Move-CsUser : HostedMigration Fault: Error=(506) - Cannot Migrate Skype for Business User From Online to On-Prem

The Error


I recently had the pleasure of running into this seemingly elusive "506" error when trying to migrate users that had already been configured for Skype for Business Online to a brand new On-Prem environment after configuring Hybrid. I say "elusive" because I could not find a solution on Bing or Google (yes, I started with Bing!). The actual error read as follows:

Move-CsUser : HostedMigration fault: Error=(506). Description=(The user could not be moved because there appears to be a problem with this user account. Please verify the attribute settings on the account and then try again.)


The Scenario

Let's get a good handle on what this environment looked like, and what it was currently at the time of this error, as this information is key. This organization had Hybrid Exchange setup, but all the mailboxes were homed in Exchange Online. They had also been using Skype for Business Online exclusively; there was no on-prem Skype for Business infrastructure. Lastly, Azure AD Connect was properly set up, and syncing without errors. All good and pretty!

Now, the goal here was to implement an on-prem Skype for Business deployment so that users in a particular geography could use the on-prem voice infrastructure. The plan was to implement the on-prem infrastructure, configure Hybrid for Skype for Business, and then move the users in this particular geography to the on-prem infrastructure while leaving all other users in the Online environment. Everything up to the step in which users are moved to On-Prem worked fine.

The Troubleshooting

So, Hybrid was configured, the on-prem environment worked well on its own, and the Online users were registering through the on-prem environment without a hitch. Why then, could we not simply move the users to the on-prem environment? Looking at the above error, the complaint seems to be centered around a problem with attributes. Ok, first thing, go back and ensure that your Azure AD Connect configuration is syncing successfully.

A quick look in Office 365 Admin Center verifies that the sync is happening at regular intervals, and happening successfully. Next, lets go to the actual AADC server, and make sure that the attributes for Skype for Business are all syncing successful...WAIT!!! Of course the Skype for Business attributes are not syncing! Remember, AADC was setup and configured to sync BEFORE the on-prem Skype for Business infrastructure was ever in place! Remember, one of the first things we do when installing Skype for Business Server 2015 is to extend the Schema so that all the new Skype for Business-specific attributes will be present within AD. Since AADC was installed and configured before this Schema Extension took place, AADC is not aware of these new Skype for Business attributes.

So, we go onto the AADC server, and from the START menu we find the Synchronization Service for Azure AD Connect:


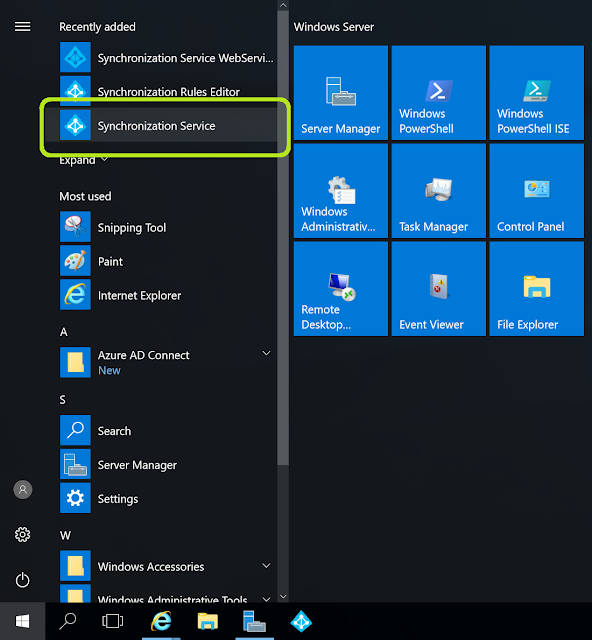
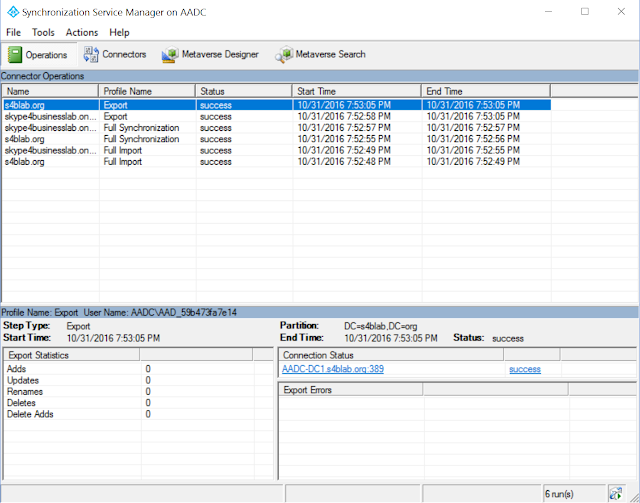
Click on it to open up the GUI:


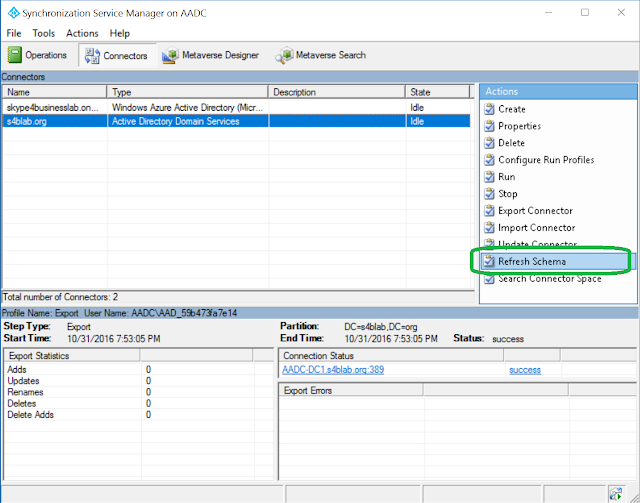
Now, let's navigate to Connectors at the top of the tool, and for each Connector (we'll do both for good measure, but highlight one at a time and perform the action), click on Refresh Schema from the list of action items on the right side of the tool:


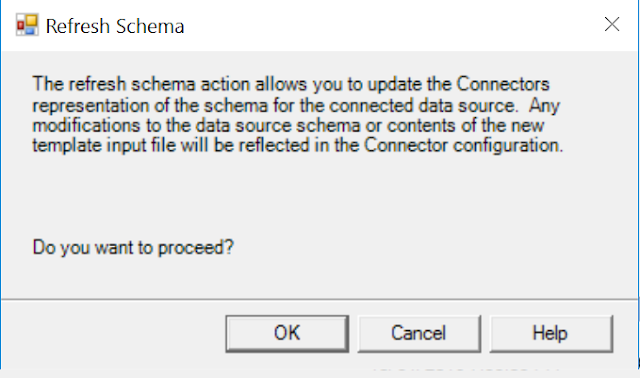
Read the warning text, and then click OK to implement the Schema Refresh:


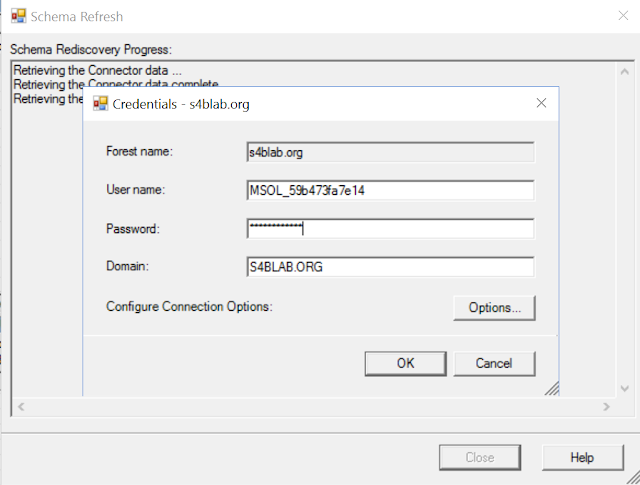
You will then need to provide credentials to connect to the Directory for the specific connector. The below image reflects that we are attempting to connect to the on-prem Active Directory, and the password must be provided. Don't forget to change the User name to a Domain Admin in your org as well; I did not do this for the below image, but did afterwards:


As you can see below, the Schema's are compared, and in the case of my test lab, there were no Schema updates, but in the scenario described in this blog post, you will see the Schema changes that were detected.


The Fix


Ok, once I updated the Schemas I waited for the next sync to occur from AADC, to make sure all the new attributes were synced to Skype for Business Online. However, after waiting for the successful sync, and trying the Move-CsUser operation once again, it STILL failed!

This is the point at which I put in a ticket with Microsoft through the Office 365 Admin Center. As usual, they responded very quickly. After going through the environment together for a while, the Microsoft tech zeroed in on one fact that I did not think anything about when I saw it. First we opened up Azure AD Connect, and then clicked on View Current Configuration:


Finally, something on the next screen stuck out to him. Can you guess what it is from the below image:


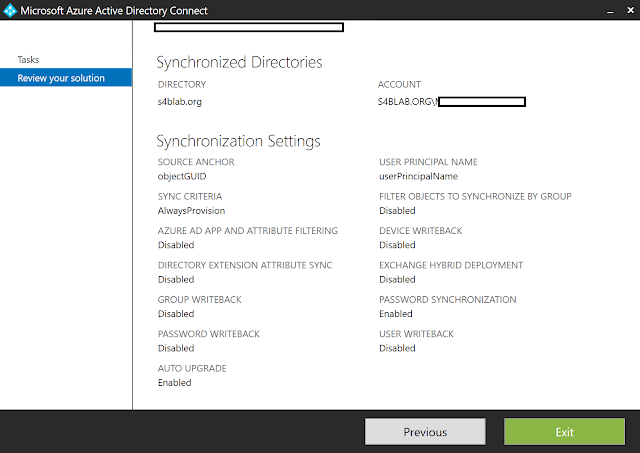
Well, if you didn't guess it, welcome to the club. It was the fact that Exchange Hybrid Deployment was disabled! Yep. EXCHANGE HYBRID.

Of course, I argued that this shouldn't matter, as this should be for Exchange Hybrid settings; there is no checkbox for Skype for Business Hybrid. At this point, the tech acknowledged that even though this field is labeled as "Exchange", it actually pertains to the environment as described above as well. Unfortunately, there was no technical documentation to back this up, at least that he knew of, but at this point I figured, "What the heck, what will it hurt to try it at this point?!" Hitting Previous in the Azure AD Connect GUI, I then clicked on Customize Synchronization Options, and then Next.

Of course, we must authenticated again:


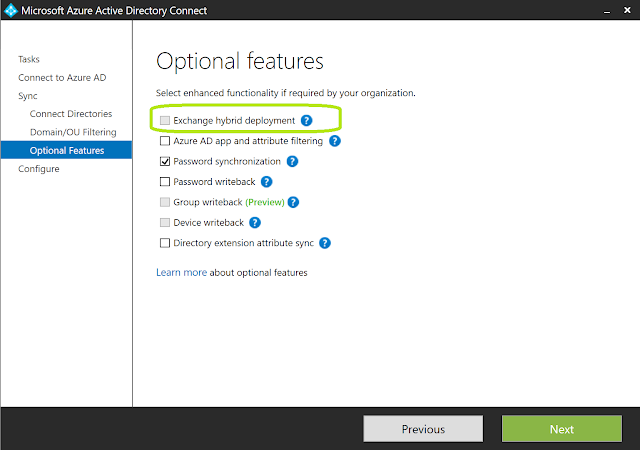
After putting in credentials for Office 365, making sure that your on-prem AD domain is already added in, and skipping on down to the Optional Features tab, you will see that the Exchange hybrid deployment checkbox is not checked. (NOTE: in my lab environment, I do not have Exchange or Skype for Business installed, so this option is Greyed out. In the real-world environment described throughout this post, this option is NOT greyed out.) Check it, and then click Next:


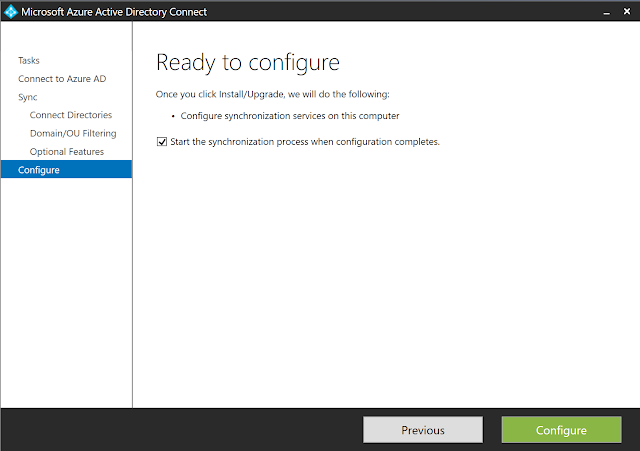
On the Ready to Configure screen, make sure that you leave the checkbox checked for starting a sync, and then click Configure:


When the configuration is complete, just click Exit, as seen below, and wait for the synchronization to finish. Depending on the size of your environment, the synchronization could take a while. I want to say it took at least 15 minutes to re-sync an environment of about 1,400 people with all the new attributes.


Now, I wish I had some big fancy finish to this post, but honestly, the fact is that after I enabled Exchange Hybrid Deployment in Azure AD Connect, all the needed attributes finally synced to Office 365, and I was then able to successfully move users from Online to on-Prem. Honestly, I am still a little skeptical, simply because the setting is so blatantly labeled as "EXCHANGE" Hybrid, but I suppose it wouldn't be the craziest thing I have seen from configuration settings on Microsoft products...

At any rate, if any of you find yourselves in this so-called "Reverse Hybrid" process, and get the 506 Error due to attributes being off, it is likely that your Azure AD Connect config needs to be updated to:

1. Refresh Schema

And/or

2. Enable Exchange Hybrid Deployment checkbox.

Stay techy, my friends!


Sunday, May 1, 2016

Published: Skype for Business Hybrid Handbook, Version 2.0

It's here! Six months after the initial release of the Skype for Business Hybrid Handbook, I have published Version 2.0 to the TechNet Gallery. Oh, and the best part: it's still FREE!


So, what prompted Version 2.0? Well, I knew when I created this book, and had it pointed out afterwards, that I chose an area within the Skype for Business product that would be a frequently changing and evolving beast, which would in turn be difficult to keep up with in book form. This was proven to be very true, and so to keep the content relevant, frequent updates are necessary. The last 6 months have had a large number of fairly major changes in the Skype for Business Hybrid realm, and so it was definitely time to get a new version out there.

What's new?

Azure AD Connect 1.1

Chapter 6 covered the Azure AD Connect portion of configuring a hybrid environment, and with the release of Azure AD Connect 1.1, there were a few changes. Not only were there functional changes, but the screenshots themselves were not fully up to date. On top of this change, the Office 365 Admin Portal Preview is in full swing, so I wanted to get some of those shots in there as well.

Cloud Connector Edition

Cloud Connector Edition was still being called "Min Topology" when the first version of the book was released, and there was much uncertainty about what it would be exactly. All this time later, CCE has been released to General Availability, and people are beginning to kick the tires on it. This was clearly a Skype for Business hybrid scenario that should be accounted for in the book! Here is a preview of one of the diagrams I made for the new Chapter 13 of the of the book:


General House-Cleaning

Besides these more notable updates, there was a lot of grammar cleanup to be done, and just some other rough spots that needed to be smoothed over. Now that Chapter 13 is present, I am sure I will have to go back through and clean up some grammar or punctuation that I missed. That is where all of your awesome feedback comes in handy! ;-)

Well, I hope you are able to use the link above (below the first picture) to grab the latest and most relevant copy, and that it continues to be of use! If you haven't downloaded a copy in the first place, again, it's FREE, and I really appreciate the feedback. If you like it enough, please feel free to share it!

Stay techy, my friends!

Monday, August 17, 2015

Exploring Azure AD Connect - Part 3: Configuring User and Password Writeback with Azure AD Premium

Other posts in this series:


Exploring Azure AD Connect - Part 3: Azure AD Premium Features


Well, this series has taken a while to wrap up! What can I say? When it rains, it pours. So far, we have taken a look at setting up Azure AD Connect for synchronization in a Hybrid environment using Express Installation, and we followed that up with a look at setting up synchronization and SSO with AD FS, which of course was a bit more complicated. Now we move on to a couple of the advanced synchronization features that require Azure AD Premium licensing.

First, let's list out a few of the awesome features that can be achieved through Azure AD Premium licensing and Azure AD Connect:

  • Multi-factor Authentication
  • Self-Service Password Reset for users with Write-back to On-Prem AD
  • Password Write-back
  • User Write-back (Note: This feature was in Preview, but is not available as an option currently. I have been instructed by an Azure AD Product Manager to stay tuned for GA.)
  • Group Write-back is also possible, but does not require Azure AD Premium licensing. Groups are written back as Exchange Distribution Lists, and have other Exchange requirements
  • Device Write-back

As you can see, there are some very cool perks with using Azure AD Premium licensing. Check out this link for a more in-depth comparison of the feature sets between Azure AD licenses, and price comparison: http://azure.microsoft.com/en-us/pricing/details/active-directory/.

Getting Started - Azure AD Premium Trial

Obviously, you can go out and just purchase Premium licensing if you want to, but for the purposes of this tutorial, I was just testing and demonstrating, so I took advantage of the 30 day trial that was available.

To do this, you can log into your Admin Portal for Office 365, and then towards the bottom of the left-hand navigation menu, under the Admin menu item, click on Azure AD. This will open up the Azure AD portal. From here, you will click on the ACTIVE DIRECTORY tab on the left side of the screen, and then click on your AD instance name. In my case, this was "The MS UC Guy". You will now see the below screen, and as you can see, our Trial awaits with the TRY AZURE ACTIVE DIRECTORY PREMIUM NOW link button at the top of the screen. Click on it.


You will then be prompted to agree to the terms of the Azure AD Premium trial in the Activate Azure AD Premium trial box. Click the check mark button at the bottom-right of the box.


After accepting the terms, you are brought back to the main Active Directory screen, and you can see that your Premium trial is being activated.


Once your Premium licensing has been activated, it is time to go to your server that has been setup to run Azure AD Connect. Let's take a quick moment to look at what our On-Prem environment looks like.

On-Prem Lab Environment


My "On-Prem" environment is the same virtual environment in Rackspace's Public Cloud that I used in the previous posts in this series, minus a couple servers. All servers in this environment are running Windows Server 2012 R2, and are fully patched. All are joined to the S4BLAB.org Active Directory domain. The environment consists of:
  • 1 Active Directory Domain Controller
  • 1 small server for installing Azure AD Connect
  • 1 small client VM, joined to the on-prem Active Directory domain

Office 365 Environment


I am using the same Office 365 tenant that I used in my previous posts, using only Skype for Business Online Plan 2 licensing, and now the Azure AD Premium licensing. I cleaned up the environment by uninstalling Azure AD Connect completely from the on-prem server, deactivating synchronization in the Office 365 portal (this can take up to 72 hours to take effect), and then deleting all users that had synced from the on-prem Active Directory from the last post.

NOTE: You must also delete the users in the Deleted Users section of your Office 365 portal as well, because if you have any same-named users from a previous lab/demo, you can run into issues where password writeback won't work due to duplicate entries. You cannot purge the Deleted Users from the Office 365 Admin portal; instead, reference this article for how to connect remotely via Azure AD Powershell module, and purging those users: http://jaapwesselius.com/2014/12/10/purge-deleted-users-in-office-365/.

Per the last post, the custom domain "s4blab.org" is already setup in the portal, with all necessary DNS records having been created. Lastly, before getting stared, I navigated to the Active Directory synchronization line at the top of the Active Users page in the Office 365 admin portal, and clicked the Manage link button. From there, I activated AD synchronization by click the Activate button, as seen below:


Configuring Azure AD Connect for User & Password Write-back

Alright, now it is time to get into how to configure Azure AD Connect on our on-prem server. The advanced features that we will be demonstrating are User Write-Back, and Password-Write-Back, because how cool is it that we can manage our users in the Cloud, and have the changes synced back to our on-prem AD?! Let's dig in:

  • Once you have downloaded the Azure AD Connect tool from Microsoft's Download Center, run the AzureADConnect.msi file. You will see the below Welcome screen. Check the box next to "I agree to the license terms and privacy notice.", and then click the big green Continue button. 
  • On the Express Settings screen, click the Customize button at the bottom.
  • On the Install required components screen, leave all the boxes un-checked (unless any of those specific Optional configurations apply to you for some reason), and click Install. You will then see the progress bar as the required components are installed. 
  • The User sign-in screen comes up and gives you three options. This time, we will leave the default option selected, Password Synchronization, and then click Next. 
  • The next screen is the Connect to Azure AD screen. Input credentials from your Office 365 subscription that have the Global Administrator role assigned (preference here is to use an @domain.onmicrosoft.com account, and NOT a user with the same domain name that you are about to sync with), and click Next. You will see your Microsoft Online credentials be validated, and information from your Office 365 environment verified. 
  • Next, you will add your on-prem AD domain on the Connect your directories screen. You should already see the Forest field populated. Add your credentials, and then click the Add Directory button. The credentials get verified, and then you can see the directory added. Click Next
  • Leave the defaults selected on the Uniquely identifying your users screen, and click Next
  • On the Filter users and devices screen, you can either enter a Distinguished Name or name of a group in AD, and then click Resolve, or you can Synchronize all users and devices. We are leaving the defaults since this is just a demo environment, and clicking Next
  • The Optional Features screen is where we make our important selections for this post. As you can see, the Password sync box is selected and grayed out because of our earlier selections in the wizard. We will now check both the Password writeback and User writeback boxes (Note, as of the time of this post, User Writeback still shows as being in Preview). Click Next
  • Next we come to the Writeback screen, where we need to traverse the on-prem AD tree structure to select the target Organizational Unit (OU) for User Writeback. Here we have created a special OU for this: The Users OU underneath the Awesome OU, of course! Once you select the desired OU, click Next

  • Finally, we have the Ready to configure screen. This gives us a chance to review our previous selections. We are going to leave the Start the synchronization process as soon as the configuration completes box checked, and click Install. 
  • After clicking Install, we see the wizard make several configuration changes before finally showing us the below Configuration complete screen. Click Exit. 


Now, if I had been thinking, I would have had users created in the first place, so that we could see that the initial synchronization replicated those users to Office 365. However, I didn't do that, so I went ahead and created Josh, Jack, and Jill in our Awesome -> Users OU: 


Now, back on our Azure AD Connect server, I click on the Start menu, and find the Azure AD Connect Synchronization Service, and click on it:


Now we see the below tool:

We are going to click on the Actions menu, and then select Run from the drop-down menu:

A pop-up box opens up, and we need to select Full Synchronization. Then click OK.

After this synchronization runs, we should be able to see it's successful status in the Service tool that is open. Go ahead and close this tool now, and let's go back to the Active Users screen in our Office 365 Admin portal. Voila! Look at those users!


User Writeback

(Note: This feature was in Preview, but is not available as an option currently. I have been instructed by an Azure AD Product Manager to stay tuned for GA.)

Ok, so, now that our users have synced from our on-prem AD to Azure AD, let's flip that switch. We create a new user called "Cloud Man", and as you can see below, his Status shows as "In Cloud".


NOTE: when going through the user creation wizard in Office 365, I selected the Azure AD Premium license. Without this, the user would not be able to sync back to the on-prem AD. Alright, time to go check out our on-prem AD and see if this user replicated. If you do not see them in AD yet, you may have to wait for a while before the next synchronization pass. However, after waiting a while, I was able to see Cloud Man in the proper OU (as defined in the wizard earlier. User Writeback is a success! 


Password Writeback

Alright, back in our Office 365 Admin portal, we now need to go to one of the users that we synced from our local Active Directory, check the box to the left of their name, and then click the Edit button under the Assigned license section on the right.


In the Assign license overlay, select the user's country from the drop-down list, check the box beside the desired license (in this case we want Azure Active Directory Premium for Password Writeback functionality), and then click Save


Now, with Jack's user object still selected, click on the Reset Password link button in the user actions on the right side of the screen. 


The resulting overlay allows us to specify an email address that the password will be sent to, and we can also choose to require the user to reset their password at next logon. We have left  this unchecked for this demo. Click Reset.

Once the reset finishes, you should see this reported back as a success, and you will be given the password. Make note of this password, so that we can try logging in with Jack on our test client VM. Click Close

Now, to prepare our client VM, we needed to allow Jack to logon to the server by adding him to the Remote Desktop Users group on the server, but this is not  necessary if you are logging onto a client OS in your AD environment, rather than a VM with a server OS.

Lo and behold, once I logged in with a new password, I was actually prompted to change my password (the one issued from Azure AD was a temporary password since it was done by the administrator, and not by the user themselves via Self-Service Password Reset). Amazing!

In Summary....

In summary, Azure AD Premium licensing is freakin' awesome! The new feature set that opens up to Office 365 hybrid users is incredible, and I have just scratched the surface (barely!). Don't take my word for it, though. Dig in, and open up a new world of hybrid goodness to your organization!

Stay techy, my friends!

Wednesday, July 29, 2015

Exploring Azure AD Connect - Part 2: Configuring SSO with AD FS

Other posts in this series:


Configuring Azure AD Connect with AD FS for Single Sign-On (SSO)


In the last post of this series I went over the basic, and fairly pain-free, process of syncing users and passwords from an On-Prem Active Directory environment to an Azure AD instance using the Express Configuration of Azure AD Connect. However, in some organizations, a requirement for single sign-on (SSO) may exist. After all, who wants to log into their laptop at the office, and then proceed to have to login to their O365-based OWA and SharePoint sites with the same credentials?! Not this guy.

Thus, a need for SSO exists, and Azure AD Connect can help meet this need by connecting to our Azure AD from our on-prem environment, setting up synchronization, AND installing and configuring AD FS. All this is done from the Azure AD Connect wizard, which is even more amazing. The wizard installs the needed pre-requisite software on the AD-joined server that you have set aside for Azure AD synchronization, and then proceeds to walk you through connecting to Microsoft Services Online (MSOL), following up with installing and configuring AD FS on the servers that you set up ahead of time. 

Let's take a look at what this process looks like.

Office 365 Environment

I am using the same Office 365 tenant that I used in my first post, using only Skype for Business Online Plan 2 licensing. To clean things up, though, I uninstalled Azure AD Connect completely from the on-prem server, deactivated synchronization in the Office 365 portal (this can take up to 72 hours to take effect), and then deleted all users that had synced from the on-prem Active Directory from the last post. Per the last post, the custom domain "s4blab.org" is already setup in the portal, with all necessary DNS records having been created. Lastly, before getting stared, I navigated to the Active Directory synchronization line at the top of the Active Users page in the Office 365 admin portal, and clicked the Manage link button. From there, I activated AD synchronization by click the Activate button, as seen below:


On-Prem Lab Environment

My "On-Prem" environment is actually a virtual environment in Rackspace's Public Cloud. All servers in this environment are running Windows Server 2012 R2, and have been fully patched, and all are domain-joined (in a typical production environment, you would have your AD FS Web Access Proxy in a DMZ, not in the AD domain). The environment consists of:
  • 1 Active Directory Domain Controller
  • 1 small server for installing Azure AD Connect
  • 1 AD FS server
  • 1 AD FS Web Access Proxy server
Please note, for Azure AD Connect to be able to install the necessary AD FS roles on both the AD FS and AD FS WAP servers, you must enable Remote Management on these servers. You must also do this on the DC, if you plan to have the wizard automatically create a Managed Service Account in Active Directory.

Configure Synchronization with SSO in Azure AD Connect

  • First, you must download the Azure AD Connect tool onto the server that you have joined to the domain for establishing your hybrid synchronization scenario: https://www.microsoft.com/en-us/download/details.aspx?id=47594
  • After you double-click the Azure AD Connect installer, the first screen you will see will prompt you to agree to the terms. The next screen prompts you to either choose Express Configuration or Custom Configuration. We do not want Express, as we need to set up ADFS. So choose the Custom option.
  • The next screen asks what type of Synchronization we want. The first option will only allow for synchronization, but not SSO. Select the second option, Federation with AD FS, and then click Next. 

  • Next, you need to input your Azure AD credentials. This should be an account within Azure AD that has the Global Admin role, and it should be the an account with a domain of "@domain.onmicrosoft.com"; DO NOT use an account with the same domain name as the AD domain that you are trying to set up synchronization for. 
  • Next, input an account with Domain Admin privileges to connect to your on-prem AD. Once you have entered the credentials for the domain that is listed in the Forest box, click on Add Directory, and the domain will be added at the bottom. 
  • On the Uniquely identify your users screen, leave the defaults, and click Next 
  • On the Filter users and devices screen, you can either choose to Synchronize all users and devices, or you can specify a specific group in your AD that has the users that you want to synchronize. The second option is good for pilot environments, but to be perfectly honest, I was not able to get my environment to sync until I reconfigured the Azure AD Connect tool to Synchronize all users and devices. This is very likely a config problem on my part, but still, with no errors at all indicating a problem, either in the application or in the logging, I was not able to get to far on the troubleshooting. 
  • For the Optional Features, simply leave the Password Sync radio button checked. In the below example, I also checked Password Writeback, but that does not need to be done for SSO purposes.  
  • Now it is time to set up the AD FS farm. At the top of the AD FS Farm screen, you can choose to either Configure a new Windows Server 2012 R2 AD FS farm, or you can choose to Use an existing Windows Server 2012 R2 AD FS farm. Leave the default, which is Configure a new Windows Server 2012 R2 AD FS farm (Remember, we have a server ready for AD FS, but have not yet set up AD FS itself). Click the Browse button next to the CERTIFICATE FILE field, browse to your certificate with private key (.pfx file), enter the password for it, and click OK. You will now see the certificate's Subject Name below, and the new AD FS Service Name. Click Next.
  • Next, enter the server name in the Server field and click Add. You will now see a progress bar at the bottom of the screen as connectivity to the AD FS server is verified. If you have not ensure that Remote Management is enabled on this server, as mentioned above, this step will not work until you do so.
  • You can now see that the AD FS server was connected to and verified. Click Next
  • Repeat the above step for the AD FS Proxy server, and then click Next. 
  • Now you need to enter credentials that the Proxy server will use to request a certificate from the AD FS server. Once you do, click Next
  • On the AD FS Service Account screen, leave the first option selected, Create a group Managed Service Account. Again, this will not work if you have not enabled Remote Management on the DC that you are attempting to connect to. Click Next.
  • Almost through the wizard! Now you are at the Azure AD Domain. Select the domain that you want to federate with from the drop-down. If you only have one custom domain added in Azure AD, then you will only have the one domain available in the drop-down. Notice the warning at the bottom, that current logons will get disrupted during this operation. Click Next
  • Finally, the Ready to configure screen will give you a nice little summary of the actions that are about to be performed. Leave the box checked for Start the synchronization process as soon as the configuration completes
  • A progress bar displays the Configuring progress. Here we can see where AD FS is being setup remotely via the wizard. SO cool! 
  • After the AD FS portion is completed, we see that the synchronization is kicked off: 
  • The last screen, the Verify one, prompts you to set up the necessary AD FS DNS records in both your internal and external DNS zones. I had already set up the records for the AD FS service URL, and thus I clicked Verify, successfully resolving the records. Once we close the wizard, we should be able to go into our Active Users page in the Office 365 portal and view all of our newly synced users: 


At this point, we want to test our SSO capabilities. I temporarily set up one of the newly synced users, josh@s4blab.org, as a Global Admin, within the Office 365 Admin portal. When I browsed to https://portal.office.com, I get the typical Office 365 login page. After typing in the username and tabbing to the password field, however, I get redirected to my on-prem AD FS forms-based login page. Office 365 detected that the domain I was logging into was setup for SSO, and knew where to forward my users to. Very cool, and it also confirmed that AD FS was setup, functional, and reachable publicly.

After entering my password, though, and hitting Enter, I received a fairly generic error about not being able to be logged in: "Sorry, but we're having trouble signing you in. Please try again in a few minutes. If this doesn't work, you might want to contact your admin and report the following error: 80041034".


Well, I knew that the user had synced, cause I could see him in the portal. I knew that the AD FS sign-on page was reachable. I knew that AD synchronization with SSO showed as Activated in the portal. SO what was the problem?

Well, after digging into event logs (without finding anything helpful) and doing much research online, I finally discovered that there were some certificate issues within the AD FS Management console. The publicly-issued certificate that I provided during the AADC wizard was fine, but both the Token-decrypting and Token-signing certificates showed up as not Trusted when I viewed them within the console. To correct this, I performed the below actions:
  • On the AD FS server, navigate to AD FS Management console -> AD FS -> Service -> Certificates.
  • Highlight either the Token-decrypting or Token-signing certificate by clicking on it, and then click on View Certificate... in the Actions pane. 
  • Once the Certificate window pops up, we see the ugly message below telling us that the certificate is not trusted. Click on the Install Certificate button.
  • On the Certificate Import Wizard, make sure to select the radio button next to Local Machine, and click Next
  • On the Certificate Store screen, check the box for Place all certificates in the following store, and then click Browse... 
  • In the Select Certificate Store popup window, select Trusted Root Certification Authorities, and then click OK. Click Next on the Certificate Store screen, and finish up the wizard. 
  • You should then see the below popup telling you that the import was successful. Click OK, and then click OK on the Certificate window. 
  • Now, you should be able to open the Certificate properties window again, and this time you should not see any unsavory message about the certificate not being trusted. 


And that did it! I was now able to log in to the portal, while being redirected through my AD FS sign-on page, and was successfully authenticated. I am not sure if I just initially missed something when it came to the above issue with AD FS certificates, as I am sure the intended experience is for the Azure AD Connect wizard to handle the entire setup from one place, in a simple manner. However, for those of you that run into similar issues with trying to get SSO working with your directory synchronization, I hope the above helps you. Feel free to leave comments letting me know if this helped, or if you came across another piece of the puzzle!

The next and final post in this series will be going over some of the special features that can be achieved with Azure AD Connect if you have implemented the Azure AD Premium licensing for your users.

Stay techy, my friends!