Wednesday, May 20, 2015

Adding Personal Skype Contacts in Skype for Business

So, what's the deal with adding non-Microsoft Live ID contacts in S4B?


I figured the traditional sarcastic meme was the appropriate way to start this post, as I have seen a fair amount of back-and-forth around this topic in various forums. At the heart of this topic is the fact that  the ability to add personal Skype contacts, specfically Skype contacts that do not use a Microsoft Live ID to sign in, was touted as a cool new feature of the soon-to-be released Skype for Business Server 2015 earlier this year. This feature was highly anticipated by many Lync Server administrators.

While we all awaited the launch and availability of Skype for Business Server 2015, Skype for Business Online began getting rolled out, and there were many announcements and product updates highlighting this. This means that Skype for Business Online was the platform that early adopters had to use as their initial playground and testbed. That is all fine and good, except that there began to be confusion about the phased rollout of updating existing Lync Online users to be Skype for Business Online users. To compound the confusion, the Skype for Business user interface was released in an Office update before ANY of the server releases, and communication that clarified all this was a bit...sketchy. 

The end result of the above set of circumstances was that there were many users that thought that they were fully migrated to Skype for Business Online, and therefore had the full set of features available, when in reality this was not the case for such users. So, there were many people that expected to start being able to federate with personal Skype contacts. Instead, what many of them encountered was the same functionality as before: the Skype contacts had to be signed in with Microsoft Live-ID connected accounts. Articles like the following added confusions, because they reinforced this requirement: https://support.office.com/en-ca/article/What-to-try-if-you-cant-IM-Skype-for-Business-Lync-or-Skype-external-contacts-87f6d5d7-3b8c-4196-9c8c-1dabb75f54b8?ui=en-US&rs=en-CA&ad=CA

The Smoke Has Cleared, and the Skype Directory IS Available in S4B!


However, despite the confusion, the Skype Directory IS accessible, and personal Skype contacts CAN be added, provided that the backend Front End and Edge servers are both running Skype for Business Server 2015. There you have it: Skype for Business Online users that are fully migrated are now able to add personal Skype contacts, and on-premise environments with both Skype for Business Server 2015 Front Ends and Edge servers can do the same. For confirmation, check out the following links:


Alright, well, this was not really an elaborate "How-To" or anything, but this seemed to be a topic I have seen resurface several times, each time without much clarity, so I wanted to help shed some light on it all. I hope this helps at least a few of you out there!

Stay techy, my friends!

Tuesday, May 19, 2015

Skype for Business Voice Route Ordering Per PSTN Usage

Does the order really matter?


So, we all know that Enterprise Voice can be a tricky thing to navigate in Skype for Business and Lync Server. This is especially true if there are multiple conferencing numbers in multiple regions, with multiple routes/trunks/voice polices/etc. The key word to here seems to be "multiple", wouldn't you say? If we only one had site, and only really needed to dial numbers within the US, and only had one conference number, then things would be SO much easier, right? The reality, though, is that many of us might feel like this when trying to get our Enterprise Voice routing just right:


So, with the assumption that we already know that PSTN Usages will be tried in the order in which they appear within a Voice Policy, and each PSTN Usage is then associated with a Voice Route, why do we need to be concerned with the order of Routes? Would that not be decided by by the order of the PSTN Usages within a given Voice Policy, as we just mentioned? Very good questions.

First of all, yes, the Route order would be determined by the PSTN Usage order that the Route is associated with within a Voice Policy. BUT, let's not forget about that beautiful M:N Routing functionality! Essentially, the above is true, but only under the assumption that there is only 1 Route associated with a given PSTN Usage. If we mix it up a bit, though, and have multiple Routes associate with a PSTN Usage (are your eyes crossing yet?), then how do we control the order in which the routes will be tried for a single PSTN Usage? And again, does it even matter, as long as the call gets where it needs to go?

The short answer is Yes, it can matter, though it often does not. Let's take a look at how we would even go about re-ordering the routes in the Skype for Business Control Panel, and then answer why this may matter.

How to order Routes for a single PSTN Usage


Alright, so first, let's take a look at a Voice Policy in our Skype for Business Control Panel. Here we see that we have a single policy, the default 'Global' policy. Just from this screenshot, we can already see that there are two PSTN Usages assigned to this policy: "Local", and "Long Distance".


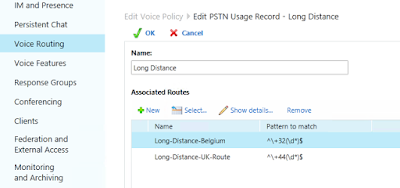
Now, when we open up our 'Global' voice policy, we have a bit more information. For our purposes, we are going to be focusing on the PSTN Usage called "Long Distance". Looking at the Associated routes of the "Long Distance" usage, we can see that there are two routes associated already: "Long-Distance-Belgium" and "Long-Distance-UK-Route". Obviously the first route is intended to route calls to a trunk for Belgium-bound calls, and the second is for calls that are destined for the UK.


The order that the Associated routes appear in in the above screen is the order in which the routes will be tried (again, we will go over why it might matter which ones are tried first shortly). For argument's sake, let's say we want to try the UK route before the Belgium route. Obviously, we need to change the current order. If we highlight the "Long Distance" PSTN Usage and click on Show details, we are presented with the below screen:  


As you can see from the navigation menu at the top, we are viewing each of the routes associated with a PSTN Usage within the Voice Policy itself. We can also see that the only option here is to rename the PSTN Usage; we can view the details of the routes, and add new routes to be associated with the PSTN Usage, but there is no way to re-order the routes in the above screen. This is true even when we navigate to the PSTN USages tab and click on the specific Usage's settings, because if we recall, PSTN Usages have no settings themselves; they can be named, and then associated with voice policies and routes, but that is it.


So, if we can't modify the order that the routes are tried in for a given PSTN Usage from the voice policy or the PSTN Usage itself, where can we modify the order? Well, it may seem a little backward at first, but the Routes tab is actually where you would go to do this. As you can see below, each route is listed, and when one route is highlighted, the menu above the routes gives you options to either move that route up, or down. Notice that the order of the routes below (from top to bottom) is the same order as how the routes appear when looking at the PSTN Usage settings within the 'Global' voice policy.


So, as our goal is to have the UK route tried first for a match with the already normalized number being dialed, we want to:
  1. Highlight the "Long-Distance-UK-Route" route
  2. Click on the Move up menu item
  3. Click the Commit drop down, and select Commit All
  4. Click OK when prompted
  5. Rejoice because you just changed the route order!
Note: in a production environment, you may want to triple check your work, and run a couple test scenarios before "Committing" the changes. Check out the order now:


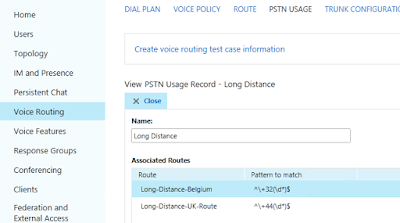
To double check our work and make sure that order of the routes has been changed for the PSTN Usage, let's go back and look at the PSTN Usage in our 'Global' voice policy:


Sure enough! The routes are now re-ordered, and any call that gets dialed and tried through the "Long Distance" PSTN Usage will try the UK route for a match first.

So, why would you care about the route order?


As for why the route order matters, for the most part, especially in smaller, less complicated environments, the order does not really matter. However, in the event that you have more than one route associate with a PSTN Usage, and more than one of the routes would be a match for the normalized number, but each route would send the call to a different destination, your calls may not be sent to the destination that you are hoping for. So it may be important to re-order the more specific routes to the top, and leave the routes that are more "catch-all" in nature toward the bottom.

Another reason that you may want to re-order your routes for a single PSTN Usage would be to optimize traffic in your environment. For example, given the above scenario, let's say that you have a LOT of voice traffic, and your servers are hit pretty hard with processing those dialed numbers. Now let's say that almost all of your international calls are to the UK. If you had not changed your order above, then the server has to try the Belgium route first for each international call, putting more strain on the server. Once the re-order was committed, most of those calls are only going to have to try one route now, as opposed to two, before being successfully routed.

Well, once again, I hope this has been helpful Thanks for sticking through my commentary to get to the meat of this topic, and feel free to share your thoughts!

Stay techy, my friends!

Tuesday, May 12, 2015

Skype for Business Install on Windows Server 2012 R2: Don't forget KB2982006

Hello all! It's been a busy start to the week, but I wanted to take a quick moment to share a tidbit of knowledge I have run acrosse while installing Skype for Business. Here is the scenario:


  • Setting up a small lab with Rackspace Public Cloud VMs.
  • Deploying a Standard Edition install of Skype for Business
  • Server OS is Windows Server 2012 R2
  • Server has been added to AD Domain
  • All Windows & Security updates have been installed
  • All Prerequisite Roles & Features have been installed
  • Administrative Tools were installed
  • AD  was prepared by extending Schema, preparing Forest, and preparing Domain
  • Prepare First Standard Edition Server step was successfully run
  • On the Install or Update Skype for Business Server System step, Step 1 completed successfully

Then, the problem: Step 2 failed with the error stating that not all prerequisites had been met, and it cites the KB article 2982006. This update was not picked up my the local OS when checking for updates, apparently, but is required by Skype for Business Server for install.

Now, to obtain the update, you can start the download process by clicking on the "Hotfix  Download Available" button here: https://support.microsoft.com/en-us/kb/2982006. Once you do this, though, it is not a direct download. You are prompted to first select the proper download, which should be the x64 version of the download, and then you must enter your email address. Within a few minutes, you should receive an email from Microsoft with a link for a direct download of the hotfix. This email also includes a whole lot of warnings about backing up your environment and disclaimer-like information. In my case, this is for a basic lab, so I pretty much ignored all the fine print, and just installed the hotfix. It DID NOT require a reboot.

Once you have installed the hotfix, you should be able to re-run Step 2 successfully, and on you go to Skype for Business Server 2015 testing and fun!  For any of you getting briefly stuck on this, or just planning for your environment in advance, please simply take note that KB2982006 is a prerequisite that does not get downloaded in the normal updates.

Thanks for reading!

Stay techy, my friends!

Tuesday, May 5, 2015

Tools of the Trade - Office 365 Tools for Hybrid Deployments and Migrations - Part 3

Other articles in this series:


Office 365 Tools Recap


In the two previous posts in this series, we took a look at some tools that are used in the planning and deployment phases of an Office 365 hybrid implemenation or migration.  We explored a couple of the tools used for evaluating your environment's  preparedness for directory synchronization in the first post. Then we devoted the entire second post to the Microsoft Azure Active Directory Sync tool. Now we will wrap up this 3-part series with a look a few helpful tools for diagnosing and troubleshooting connectivity issues after an Office 365 deployment.

Intro to the Tools


There are plenty of tools out there, many by  Microsoft, for troubleshooting environments, and many could be used for troubleshooting connectivity with an Office 365 or hybrid environment. However, in this post we will focus on three tools that will be most helpful for ensuring our public facing configuration is setup properly: the Microsoft Remote Connectivity Analyzer (MRCA), the Microsoft Connectivity Analyzer (MCA), and the Microsoft Lync Connectivity Analyzer.


I felt the above image was appropriate for two reasons. First, Nick Burns is freakin' hilarious. If you have never seen an SNL Nick Burns skit, let me do you a  favor:


The second reason that I felt the above meme was appropriate was because Microsoft sure didn't do us any favors with how similarly these tools are named! Especially when it comes time to take the certification exams, trying to remember which functions matched to which tool when they all sound very similar can be a bit challenging. At any  rate, I have digressed quite a bit, so lets move on to the Microsoft Remote Connectivity Analyzer.

Microsoft Remote Connectivity Analyzer


This tool is simply awesome, and has the capability to help troubleshoot, diagnose, and verify settings for various public-facing applications. For example, it can conduct analsis on Office 365 setups, on-prem Lync and OCS environments, and on-prem Exchange environments, among others. The tool is a website, making it reachable from anywhere, and not at all burdensome to your local device. It can be reached at: https://testconnectivity.microsoft.com.

Once you have arrived at the landing page for the tool, you will immediately notice the availability to test the various server components via the tabbed structure, simplifying navigation. The various tests will help you verify things like your required public DNS records, whether or not SSL certificates check out as they should, and whether or not the servers are responding on the expected ports. They can also test autodiscover settings, and verify credentials for remote access. 

Obviously the best way to get familiar with the individual tests and analysis options is to visit the site and look around on each tab. To get even more familiar with the tool, try feeding it some values for tests that are relevant to your own environment, and explore the output.

Microsoft Connectivity Analyzer


See what I mean about the tools being named similarly? At any rate, this tool is called out as a companion to the MRCA tool, but unlike the MRCA, it is a tool that must be downloaded locally; it is not a web interface. To run this tool, your client must be running Windows Vista or newer, and if running it on a server, the server needs to be running Windows Server 2008 or newer. In each case, the .NET Framework 4.5 is required.

The Microsoft Connectivity Analyzer can be used by administrators and end users, alike. Its main purpose is to test connectivity between email clients and servers running Exchange server. This is where I must stop and ask, why couldn't this tool have been names something like "Exchange Connectivity Analyzer" or "Microsoft Email Client Connectivity Analyzer"? Honestly, wouldn't either of these have been more descriptive and less confusing for the overall collection of tools? I digress....The tool is simply meant to simulate various client logon and mail flow scenarios, and would therefore be a useful tool for related situations in which there is doubt about a client's logon ability, or what mail flow pattern is being experienced.

Microsoft Lync Connectivity Analyzer


This last tool, as you can see WAS named a in a little more descriptive manner. This tool has a very specific purpose. It is meant to determine if a Lync environment, either on-prem or Skype for Business Online, meets the necessary requirements for client connectivity from mobile clients and the Lync Windows Store App. While the name of the tool would almost indicate that the tool was used for testing all connectivity to a Lync environment, it is in fact only used for the tests I just mentioned.

The tool, in the course of its analysis, tests several components. Among them, it checks public DNS records to make sure the  necessary A records and SRV records are in place. It also checks the proxy configuration for the environment. Lastly, but definitely not least important, it checks on the validity of the SSL certificates that are in place.

Wrapping it up...


Well, that about does it for our review of a great set of tools for preparing for,  deploying, and troubleshooting Office 365. I hope you all have found this information helpful, and hopefully it will come in handy while you are transitioning your company to the awesomeness that is Office 365. 

Stay techy, my friends!

Friday, May 1, 2015

Tools of the Trade - Office 365 Tools for Hybrid Deployments and Migrations - Part 2

Other articles in this series:


What is the "DirSync" Tool?

DirSync is the easire-to-say name for the Microsoft Azure Active Diretory Sync tool. And honestly, with a name that long, a much-abbreviated form was definitely needed for a tool that would be at the center of almost all Hybrid environments with Office 365. So, what is it used for? Quite simply, it is the tool that is used to synchronize your Active Directory users in your On-Prem environment to your Office 365 deployment. You can use it to sync all users, or you can apply filters and synchronize only certain groups, depending on your plans for Office 365 usage.

Why is this important?  I will answer that by also answering why it is AWESOME. Let's say your plan is to house your Lync deployment on-prem (or Skype for Business deployment because you are cool and stay up with the times), but you want to migrate your Exchange users to Exchange Online. Ok, so now you need to create all those users in Office 365, so that they can access Exchange Online. Wait, does this mean that they have to sign in to Lync using one set of credentials, and Exchange Online with another set of credentials? Well, yes, it would mean that, if you didn't synchronize all of your existing users from your on-prem Active Directory. By putting this synchronization into place, all your users will stay properly synced up to Office 365, and you can even manage their accounts and settings from your on-prem environment, with the changes being synced to the account in the cloud. And this means that SSO can also be achieved! Oh happy day!!

What are the requirements for DirSync?

First of all, this tool should only be downloaded onto, and running from, a single machine in your domain. Further more, this server is not recommended to be a Domain Controller, as issues can arise (see my previous article about a specific issue that you will encounter: http://blog.msucguy.com/2015/04/office-365-directory-synchronization.html). It doesn't mean that it won't work on a DC, but if we are talking about a production environment, I would stick to the recommended guidelines.

Secondly, you will need to deploy Active Directory Federation Services in your environment if you wish to achieve Single-Sign On (SSO) functionality. This is very important for companies that want a streamlined user experience - not wanting users to feel like they are in two different environments, but rather working out of the same single environment like they normally would. This article does a great job explaining where ADFS comes into play, and the other types of synchronizations that can be used with it: https://support.office.com/en-ca/article/Understanding-Office-365-identity-and-Azure-Active-Directory-06a189e7-5ec6-4af2-94bf-a22ea225a7a9.

Ok, what about the Technical requirements?

Alright, to get to the nitty-gritty, here is a list of system and envirnment requirements that are more technically specific:
  • The server used for the DirSync tool must be running one of the following operating systems:
    • Windows Server 2008 R2 w/ SP1, x64 (Standard, Enterprise, or Datacenter)
    • Windows Server 2012 (Standar or Datacenter Editions)
    • Windows Server 2012 R2 (Standard or Datacenter Editions)
  • The server must be joined to the Active Directory domain that is being synchronized
  • The AD Forest Functional level must be at least Windows Server 2003
  • The server must have Powershell installed (and enabled, if relevant)
  • The server requires both .NET Framework 3.5 SP1 and .NET Framework 4.5.1
  • The Domain Controllers in the environment must be running one of the following operating systems:
    • Windows Server 2003 SP1 (32 or 64-bit)
    • Windows Server 2008 (32 or 64-bit) (Standard or Enterprise Editions)
    • Windows Server 2008 R2 (Standard or Enterprise Editions)
    • Windows Server 2008 Datacenter Edition
    • Windows Server 2008 R2 Datacenter Edition
    • Windows Server 2012 (Standard or Datacenter Editions)
While the above information may seem drab, and may not pertain to too many newer environments, it can be very good information to know if you are planning on taking the Office 365 certification exams. Just sayin'...

There are other articles out there that go into much deeper dives on this tool, and I would of course encourage you to dig into them if you are moving past this introductory phase and getting ready to do so serious DirSync management. I would especially encourage you to get very familiar with the Powershell tools and cmdlets that are available for directory synchronization and remote Office 365 management, as provisioning automation will definitely rely on a solid understanding of Powershell.

For an overview on the various tools that can be used after your Hybrid deployment (or in-between phases of the deployment), check back with me on the third and final post of this series. We will be going down the list of some great connectivity testing and troubleshooting tools.

I would also like to apologize for the lack of a borderline-sarcastic meme in this post. I shall strive to not let that happen again!

Stay techy, my friends.